
Add Rep to a Member
- Click Members on the left side menu.
- Select the member you are adding a rep to from the Members dropdown list in the top toolbar.
- On the Reps tab, click Add a New Rep.
-
- Complete the form on the Contact Information section of the "Add a New Representative" screen.
- Click Finish.

Note: Alternatively, you can add a new rep by selecting "Representative" from the Add button in the top toolbar. If the Rep name already exists on the same or a different member, a warning message will appear that displays the name of that member. You may continue on and create the rep if desired.
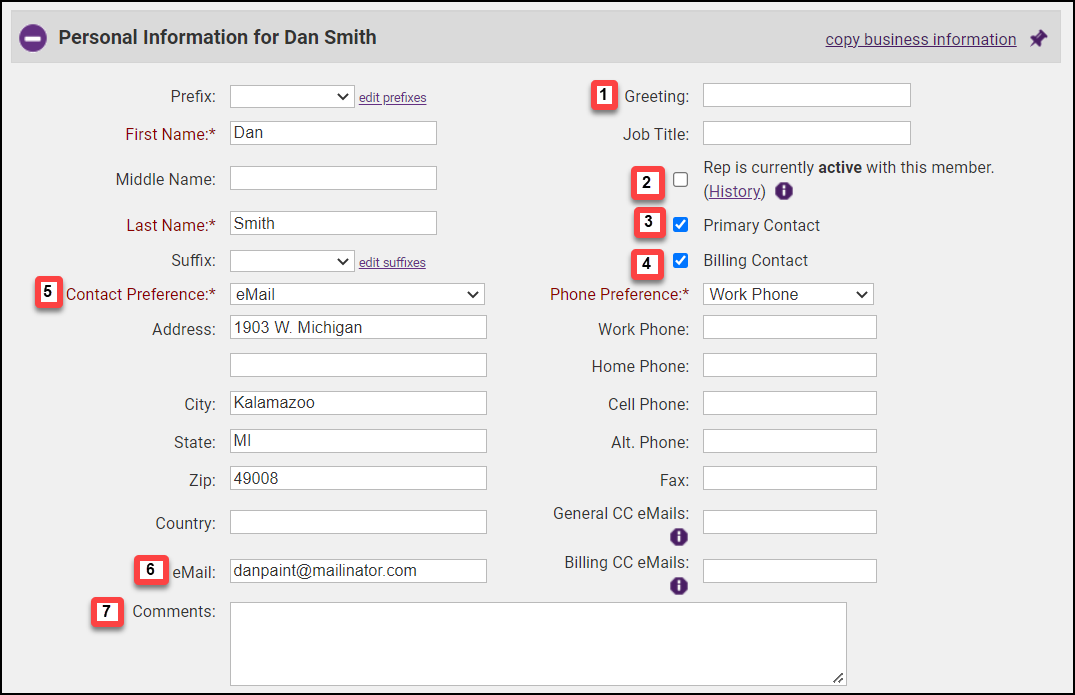
- Greeting: Specify the common name used by this individual.
- Rep is currently active with this member: When selected, this rep will be included whenever “active” reps are selected. This checkbox should be de-selected when the rep no longer is participating in membership. This checkbox may be manually de-selected here but may automatically be de-selected when the member is dropped through selections made at that time.
- Primary Contact: Make this rep the primary contact representative for the member.
- Billing Contact: When selected this rep will be included whenever “Billing reps” are selected. Billing transactions typically are addressed to the “Billing rep”. See information on “Edit Billing Contact”.
- Contact Preference: Select how the contact prefers to receive communications.
- Email: Note that the email address listed here by default is the email address provided on the General tab. This can be edited to contain the rep's individual email if desired.
- Comments: Comments are viewed only by staff who access this page. This cannot be viewed by the member/rep.
|
|
NOTE: After creating a representative, you’ll want to invite them to create their login for the Member Information Center (MIC). |

Add/Update Rep Social Network Sites
The Social network sites that you have enabled under Setup > Association Options > General Options & Settings can be populated for each rep as desired.
- For the desired member, click the Reps tab.
- In the list of reps, click the rep for whom you wish to view and/or enter Social Networks Services.

- Enter the desired social network links. Only the social networks that you have enabled under Association Options > General Options & Settings.
- Click Save.
Rep's Bio
You may enter bios for your reps, however, these bios will ONLY show if the rep belongs to a group that you are displaying on your website and you have enabled this option at the group level. See Add Rep Bio Information via Back Office and Where is a Rep's Personal Bio Displayed? for more information.
Rep Custom Fields
Custom Fields are designed to give ultimate flexibility in managing your data. When adding a custom field, you will create a database field that is available across all member records for tracking additional desired information.
See Rep Custom Fields for further instructions.
Manage Rep Group Participation
Member representatives may be grouped together to assist office staff in communicating with these reps as one entity. For instance, a task force designed to work with technology may belong to a group named Technology Task Force. These groups are created in the Groups module. Once created, reps may be assigned to these groups either in the Groups module or in the Members module on the Reps tab.
See Manage Rep Group Participation for further details.
Inactivate a Rep with a Member
Inactive status is reserved for a rep who is no longer acting as a representative for the member. The rep’s information and history will be retained, but a separate distinction is given to them in reports and lists. Removing a rep should be limited to a rep that was created by mistake. History and all references to this rep would be removed.
- For the desired member, click the Reps tab.
- In the Lists of Representatives tick the check-box for the rep you wish to in-activate/remove.
- Click the Remove/Inactivate Reps link.
- Choose one of the following options:
- Set rep as inactive and leave in current groups: This option will set the rep as inactive (and deactivate MIC log-in credentials), but leave the rep in any groups he/she is participating in.
- Set rep as inactive and remove from groups: This option will set the rep as inactive (and deactivate MIC log-in credentials), and remove from any groups he/she is participating in. This will remove from ALL groups.
- Set rep as inactive and inactivate in groups: This option will set the rep as inactive (and deactivate MIC log-in credentials), and deactivate in any groups he/she is participating in. When deactivated in a group, the rep would not receive email notifications sent to the group. This will deactivate in ALL groups. If you wish the rep to remain active in certain groups, select this option, then reactivate in the individual groups.
- Delete rep records and remove them from groups: This option will permanently delete the representative. This is not recommended practice, as historical information is maintained about reps in the database, and all will be deleted. If deleted, and you wish to restore, GrowthZone can do so, but fees will be applied.
- Click Continue.
Reactivate Rep
- On the Reps tab, click the name of the rep you wish to reactivate.

- In the Personal Information section on the Reps tab, click on the Rep is currently active with this member checkbox.
-
- Click Save.

The rep may need to be reassigned to groups if the rep was originally removed from groups when inactivated.
Note: Representative History will keep track of the members that this rep has been assigned. To view the history, locate the rep under Members > Reps tab. Open the Personal Information area and click History which is located after the “Rep is currently active with this member” checkbox.

