
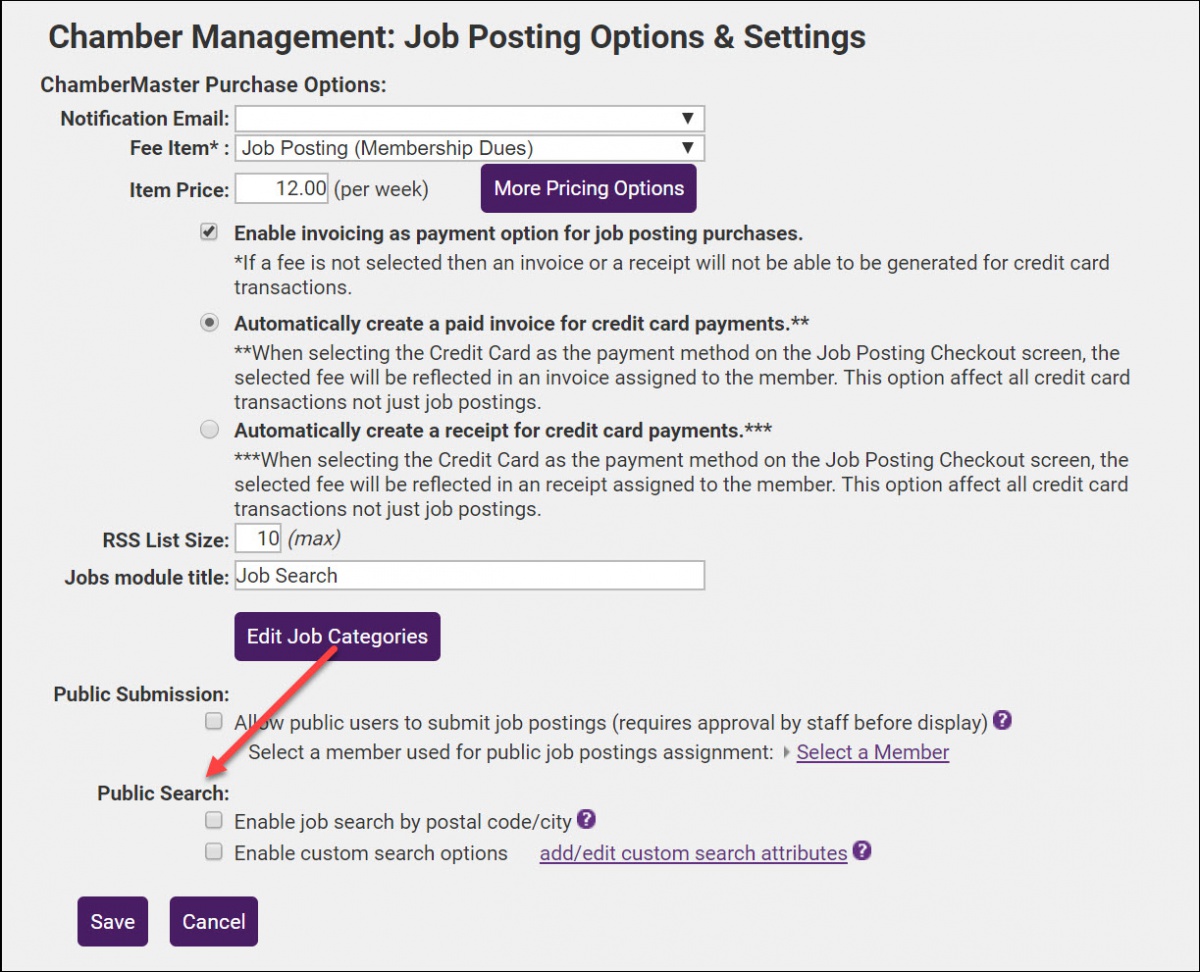
Set Up Job Posting Purchase Options
You can choose to simply offer Job Postings to your members as a benefit, or you can charge for listings to generate non-dues revenue. In the Job Posting Settings, you will be able to configure your fees for job postings, as well as configure credit card processing options.
- Click Setup in the left-hand menu.
- Click Job Posting Settings in the "Association Information" section.
-
- Configure the following:
- Notification Email: Select a staff email for the staff member who should receive a notification when a new job posting is purchased. This email is only sent if you are charging for hot deals. To receive a notification that a hot deal has been submitted and may need approval, subscribe to this under Setup > Association Employees/Reps.
- Fee Item: Select the fee item with which the job posting will be associated. The fee item (Member Due) must be created in the Billing or QuickBooks module to have the Fee Item selection available here. Fees for jobs are charged on a week-by-week basis only. Click here for instructions on setting up fee items. If the Fee Item option is left blank, members and the general public will NOT be charged for job postings. If a fee IS entered, it will only apply to those who submit through the MIC (e.g. typically members). See the note below for public job posting submissions.
-
Item Price: Enter the price for the job postings, this is a per-week price. NOTE: You may set up pricing for both basic packages and enhanced packages by clicking the More Pricing Options button. The Enhanced Package option will only apply if you have purchased the Marketing Package.
-
Invoicing Options: NOTE: Cash payment is not available as a payment method for job postings.
-
Enable invoicing as a payment option for job posting purchases - select this option if you wish to allow members to be invoiced when they enter a job posting online. NOTE: The checkbox is only available if you have selected a fee item.
-
Automatically create a paid invoice for credit card payments - select this option if you want to automatically create a paid invoice when a job posting is purchased by a credit card.
-
Automatically create a receipt for credit card payments - select this option if you want to automatically create a receipt when a job posting is purchased by credit card.
-
Click Save.

- Click Setup in the left-hand menu.
- Click Job Posting Settings in the "Association Information" section.
-
-
In the Public Search section, configure the following:
-
Enable job search by postal code/city - This selection will turn on the ability for job seekers to search for job postings based on the postal code and city that is entered in the Contact Information of the job posting. When enabled, this geographic search is available in the public job search page and also in the Member Information Center. Note: Geo-coding of the zip and/or city happens when jobs are entered from the MIC or the public page. If there is a zip or city on the Contact Information of the job posting then the zip/postal information on the associated member record will be looked at. At the present time, updates to the zip and/or city on the Contact Information in the job posting do NOT update the geo-coding.
-
Enable custom search options - This setting allows you to include additional criteria for job seekers to use when searching for job postings. For example, you might include a Salary Range attribute. NOTE: All custom criteria will display as options when a new job posting is being submitted. Only the custom criteria that are associated with the active jobs will display as search options when job seekers are searching for a job. Click the add/edit custom search attributes link to add and/or edit attribute groups.
-
- Click Save.
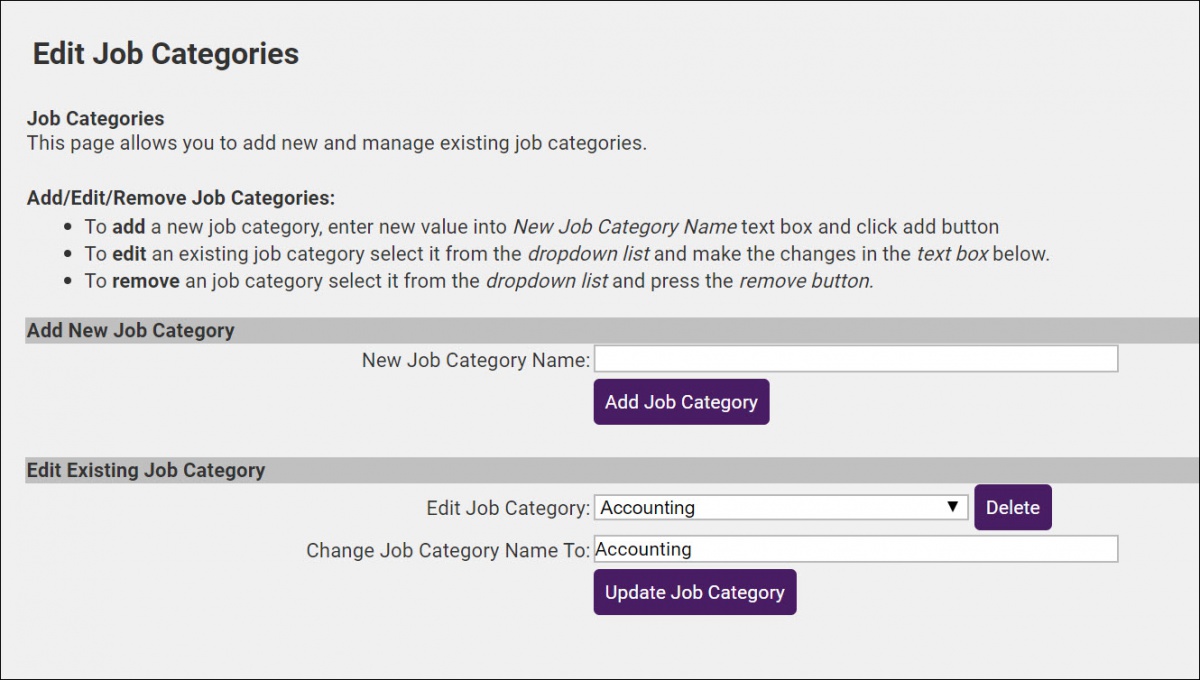
Job categories will allow for easy searching of your job postings. A default list of job categories is seeded in the database, and you may add additional categories to suit your business needs. You can update Job Categories from the Job Posting Settings screen or within the Jobs Module.
Add a Job Category
-
Click Jobs in the left-hand navigation panel.
-
Click Job Categories.
-
-
New Job Category Name.
-
Enter a name for the new category.
-
Click Add Job Category.

Edit a Job Category
-
Click Jobs in the left-hand navigation panel.
-
Click Job Categories.
-
- From the Edit Job Category drop-down list, select the category you wish to edit.
- In the Change Job Category Name To textbox, make the needed edits.
- Click the Update Job Category button.
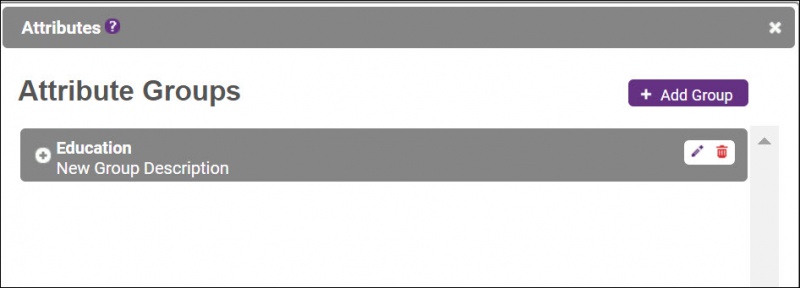
Adding job attributes provides additional criteria for job seekers to use when searching your job listings. Create custom attributes such as salary range or the number of hours per week to encourage targeted job searches. When creating attributes, you first create a grouping of the attributes (for example, education) then you add attributes to that group (for example, HS Diploma).
- Click Setup in the left-hand navigation panel.
- Click Job Posting Settings in the Association Options section.
-
-
In the Public Search section, click Enable custom search options.
-
Click add/edit custom search attributes to add, edit, or delete attributes.
-
-
Click Add Group.
-
-
Enter a name for the group in the New Group Name text box.
-
(Optional) Enter a description of the group.
-
Click the
 green check mark.
 -
Click the
 sign next to the Group Name.
 -
Click the Add button.
-
-
Enter the name of the attribute in the New Attribute Name text box.
-
Click the
 green check mark.
 -
Repeat steps 10 - 12 above to add additional attributes.
-
Once all attributes have been added, click Close.


|
|
NOTE: With attributes assigned to your job posting, a link for advanced search options is displayed on the page. The job searching area can be defaulted to always display the Advanced Search in the open position by logging in to your Internet Settings Control Panel (ISCP) and selecting Always Open or Default Open for #9 Basic Search Filter Display and #10 Advanced Search Filter Display on the General tab. This setting applies to the public business directory as well as the job posting search. |

