Your members have a secure password-protected Member Information Center (MIC) available through the Internet where they can view and edit their company information, which automatically updates the public member listing on your website, pay bills, interact with each other, submit job postings, advertise, and events for approval, and also view statistical reports. This Member-Only area may be customized by you using menu selections in the Setup module.
Customize Menu Options Available in the MIC
The selections made here determine the permissions that are available for all member logins and also set the maximum permissions allowed for all rep logins if individual rep logins are used.
- Click Setup in the left-hand menu.
- Click Member Login Area Options & Settings in the General Information area.
- Click the Permissions tab.
- Select Enable for selections that should appear on the Members’ menu, and select Disabled for selections that should not appear.
-
- Click Save.
- You will get the following warning, click OK

Permissions that are part of a Permission Set but then are disabled under Member Login Area Options and Settings will also be removed from the permission set. If the permission is later re-enabled under Member Login Area Options and Settings, it will be available to be selected within the permission set, but will be set at Disabled. It must be re-enabled within each permission set separately. Custom permission sets must be edited individually to re-enable the selection.

- Disabled: Select this option if you do not wish to display the functionality.
- Enabled: Select enabled to display the functionality in the MIC.
- Read/Write: Select this option if you wish to allow your members to view and edit the option. For example: If you wish your members to be able to update their Business Categories, select read/write.
- Read: Select this option if you with your members to view the option, but not edit it.
|
|
NOTE: The Permissions settings only define what can be available to your members in the MIC. The permission level assigned to your representatives will ultimately provide them access to the functions. See Setup Login Permissions for further information. |

- Click Setup in the left-hand menu.
- Click Member Login Area Options & Settings in the General Information area.
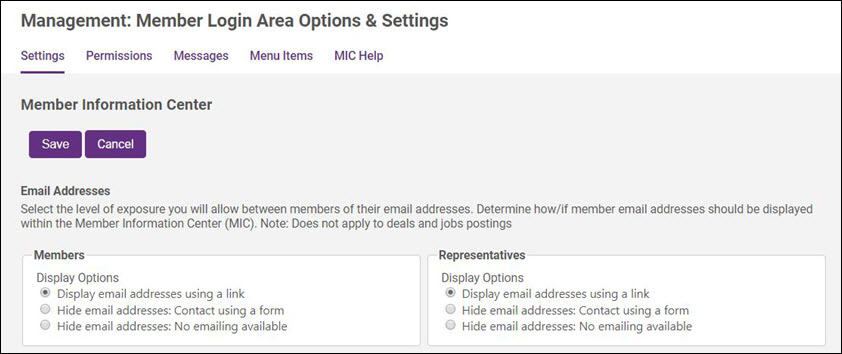
- Click the Settings tab.
- In the Email Addresses area, select how you’d like the email addresses to appear for member and reps in the Member Information Center.
-
- Click Save.
- Click Setup in the left-hand menu.
- Click Member Login Area Options & Settings in the General Information area.
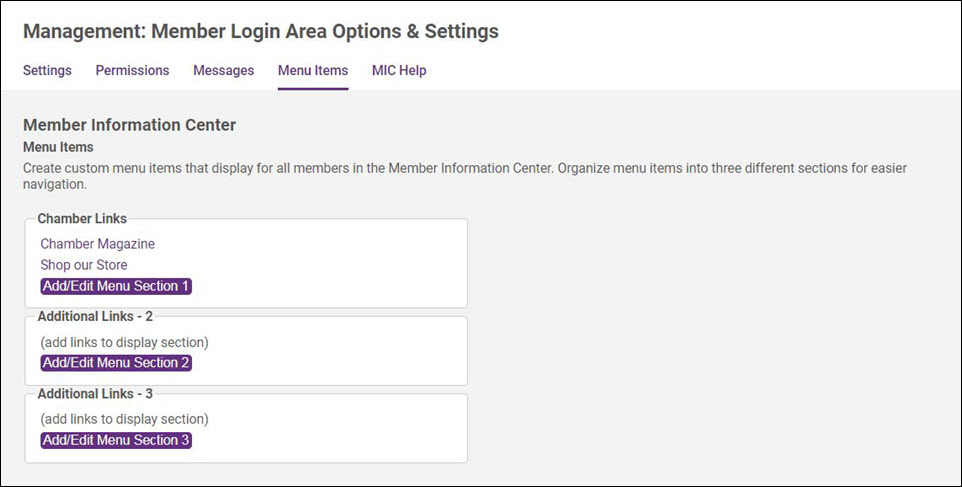
- Click the Menu Items tab.
-
- Click Add/Edit Menu Section 1 (or Add/Edit Menu Section 2 or Add/Edit Menu Section 3). Each section represents a separate section of the menu displayed in the Member Information Center.
-
- Enter a name for the new section in the Place custom menu items under the heading text field.
- Click Save.
- Click Add a New Link.
-

- Displayed Link Name - enter the name or text you would like to display for the hyperlink.
- Website URL - enter the url for the website to which you wish to link.
-
- Click Save.
- Click Continue.

- Click Setup in the left-hand menu.
- Click Member Login Area Options & Settings in the General Information area.
- Click the Messages tab.
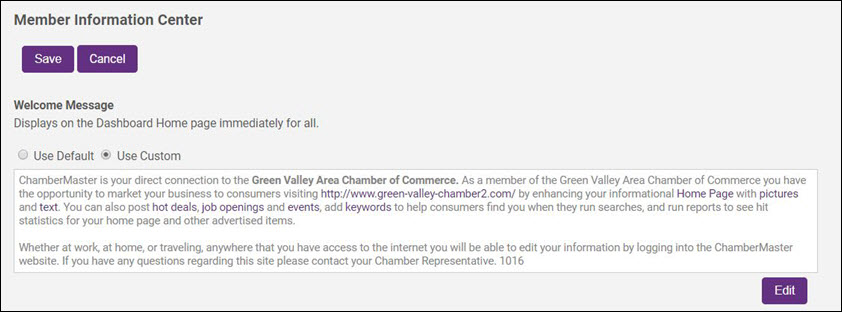
- Click Use Custom.
- Click Edit.
- Make desired changes to the text.
- Click Continue.
- Click Save.
|
|
NOTE: You can return to the default text at any time by clicking Use Default and then clicking Save. |

The Promote Your Business widget will display in Member Information Center (MIC) for those that have a Basic Web Participation package to encourage Basic package members to upgrade to an Enhanced Web Participation package. You can enable/disable the widget and control the message that appears with the widget. Promote Your Business and Upgrade Your Listing widgets appear on the Company Information->Profile Summary page. The Upgrade your Listing widget may also appear and be controlled by this setting depending on your benefits campaign arrangement with GrowthZone (if any).
- Click Setup in the left-hand menu.
- Click Member Login Area Options & Settings in the General Information area.
- Click the Permissions tab.
Edit the Message on Promote Your Business and the Upgrade Your Listing Widget
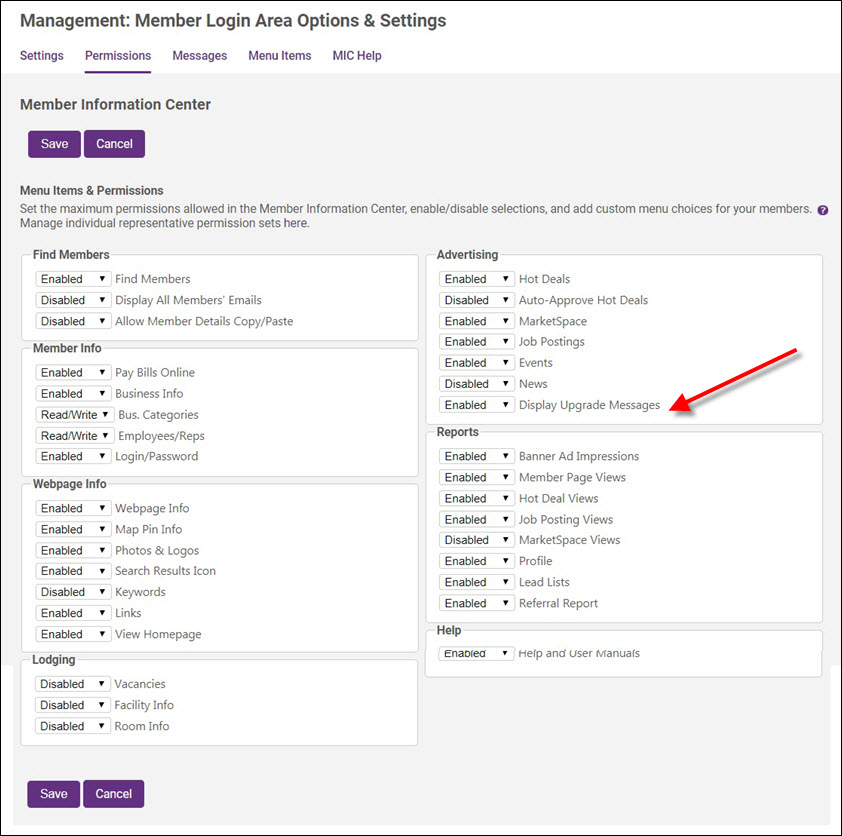
- Click the Enabled/Disabled selection in the Display Upgrade Message dropdown.
- Click Save.
- Click Setup in the left-hand menu.
- Click Member Login Area Options & Settings in the General Information area.
- Click the Messages tab.
- In the Promote your Business section, click Use Custom.
-
- Click Edit.
- Make desired changes to the text.
- Click Continue.
- Click Save.
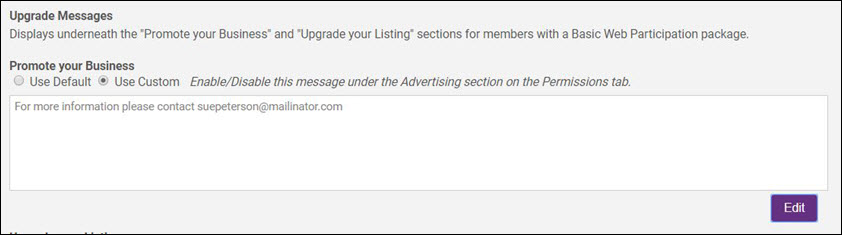
Note: you can return to the default text at any time by clicking Use Default and then click Save.
- Click Setup in the left-hand menu.
- Click Member Login Area Options & Settings in the General Information area.
- Click the Messages tab.
- Type the email addresses of the desired recipients of those that submit a request to "promote their business.”
- Click Save.
Note: you can enter multiple email addresses separated by a semi-colon.
The error received by members and reps that click Forgot Password and incorrectly enter their login credentials may be given a customized message that will give detailed instructions.
- Click Setup in the left-hand menu.
- Click Member Login Area Options& Settings in the General Information area.
- Click the Messages tab.
-
- Click Use Custom.
- Click Edit.
- Make desired changes to the text.
- Click Continue.
- Click Save.

Note: you can return to the default text at any time by clicking Use Default and then clicking Save.
The MIC Help is pre-populated with several videos which you may use as designed, or you may replace them with videos and help text of your own.
- Click Setup in the left-hand menu.
- Click Member Login Area Options & Settings in the General Information area.
- Click the MIC Help tab.
-
- Click Use Custom on either Help Item 1 or Help Item 2.
- Click Edit.
- Make desired changes to the text.
- Click Continue.
- Click Save.

Note: you can return to the default text at any time by clicking Use Default and then click Save.
Member Information Center has a powerful search ability in the member directory. Customize what options and filters display and whether include reps in addition to the members in the search results.
Customize MIC Search Results
- Click Setup in the left-hand menu.
- Click Member Login Area Options & Settings in the General Information area.
- Click the Settings tab.
-
- Select the desired filters and search result options.
- Click Save.

Enabling your QuickLinks in the MIC search will display in the MIC as Categories. Then your Categories will be labeled as Subcategories, making it easier for members to understand the hierarchy.

New Members filter displays a checkbox where those searching would see those with a Join Date of today or 30 days prior.

Selecting Yes for Display Representatives in Search Results will display only members in your MIC Directory instead of both members and rep names. If set to No, Rep names and information may still be viewed when accessing the member details page but now the rep names and member names don't have to mingle in the directory.
- Click Setup in the left-hand menu.
- Click Member Login Area Options & Settings in the General Information area.
- Click the Settings tab.
-
- Select the desired additional features or enable/disable the Community Activity Feed.
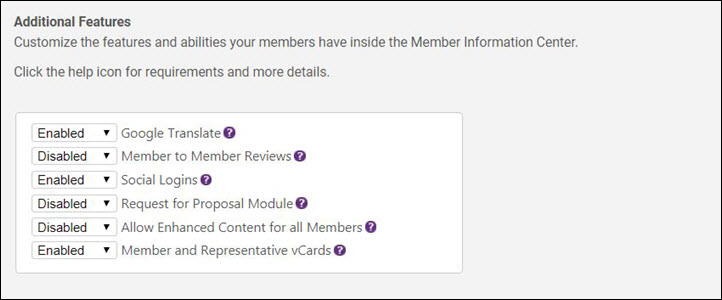
-
- Google Translate makes it possible to display the Member Information Center in the language selected by the viewer. Enabling this selection displays the Translate button on-screen.
- Member to Member Reviews enables the ability for members to rate and review each other if desired. Note: No automatic staff notifications when reviews are posted at this time.
- Social Logins allow members to log in with their social login. If disabled, this removes the social login option from your /login page.
- Allow Enhanced Content for all Members - enables the enhanced web display listing for all members.
- Request for Proposal Module turns on/off the Request for Proposal menu selection from display in the Member Information Center.
-
- Click Save.