
ChamberMaster will be the place for viewing and reprinting member transactions. QuickBooks is just recording a journal entry and doesn’t actually contain the invoice or payment.
- Verify your Chart of Accounts: Before performing an export, you will want to compare the Chart of Accounts in ChamberMaster/MemberZone to the Chart of Accounts in Quickbooks. Accounts in CM/MZ must match either the exact names or exact numbers given to your Chart of Accounts in Quickbooks. See Setup/Modify Chart of Accounts for information on viewing your chart of accounts.
- Check Transaction Classes (if applicable): If using classes in Quickbooks, ensure that the transaction classes used in ChamberMaster/MemberZone match the transaction classes in Quickbooks. Class names must match exactly the Class Name in Quickbooks. See Transaction Classes for more information on viewing and updating transaction classes.
- Check Fee Items: Make sure the Fee Items you have set up in CM/MZ are assigned to the correct Accounts. See for instructions on viewing/modifying fee items.
- Check Sales Tax Items: If you are charging Sales Tax, verify that each tax item is also assigned to a matching account. See Setting Up Sales Tax for information on viewing sales tax sets.
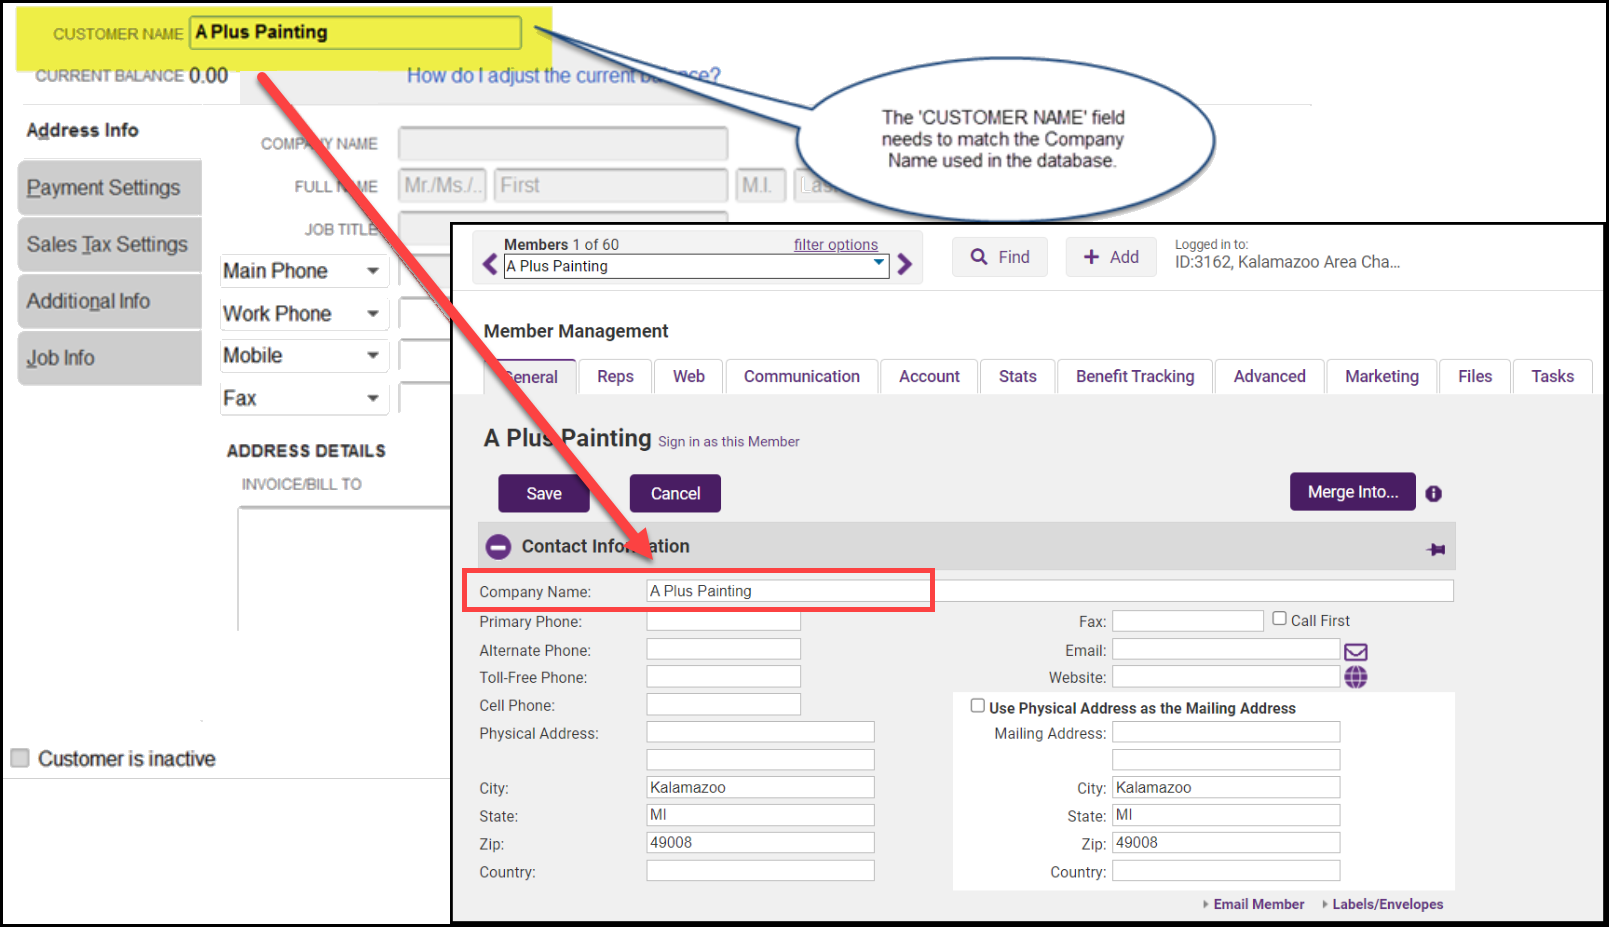
- Check Customer Names: Check your Quickbooks customer names. Customers who exist in your CM/MZ database (under Company Name), but not in your Quickbooks company file must be added to Quickbooks exactly as they appear in your database.
- For customer names you already have in QuickBooks, you will want to ensure that the QuickBooks Customer Name matches the Company Name in ChamberMaster. These two fields are the comparison fields used for making sure the transaction goes on the correct customer record. If there are any differences in spelling or punctuation, the import will fail.
- Compare these two lists by viewing the QuickBooks Customer Contact List under Reports with a Custom Report in ChamberMaster, where you might only need to select the Company Name. Fix any discrepancies between the two customer lists. You may also run the Member Activity Update report to look for any company name changes.
Testing it Out
It’s always a good idea to test out sample transactions before importing a large number of entries. So before any other transactions are created for the day*, go into the Billing module and create a couple of sample entries.
- Create an individual invoice, a payment for that invoice, and a sales receipt in the Billing Module.
- Make sure to choose a member that exists in your Member database and also as a Quickbooks Customer. The Quickbooks Customer name needs to match the Member database name exactly – letter by letter.
- Remember the transactions you create, because you will delete them when you are done testing.
- In Billing go to the Reports Tab. Under Executive click on either Journal Entry Export – Accrual Basis or Journal Entry Export – Cash Basis
- Accrual Basis – will display ALL possible transactions that match the selected filter options.
- Cash Basis – will display ONLY Payments and Receipts that match the selected filter options.
- You should see your transactions. If not, click the Refresh Button.
- Note the Account Names that are being referenced. These are the general journal entries that will be made in your accounting software.
- For the Format Option select Quickbooks IFF
- If needed, deselect any transactions that are not part of your sample entries.
- Click Export
- If prompted, save the file to a location you will remember.
You must be logged into Quickbooks as an Admin and using single-user mode
- Open Quickbooks
- Select File, Utilities, Import, IIF Files
- Locate the saved export and select.
- Your import will take place
- Look at the general journal entries that were created in Quickbooks by clicking Company, Make General Journal Entries.
- Click Previous to view the imported entries
- View the customer that was affected by going to the Customer Center. You can see the entry by the associated invoice #, sales receipt #, or payment reference #
- The payments will display in the Quickbooks Deposits (unless you created a deposit in CM/MZ and included that in the export)
- If viewing an Open Invoices report in Quickbooks, the general journal payments will not directly be applied to the open invoice amount. If you will be relying on the Quickbooks open invoice report in addition to the CM/MZ Open Invoices report, make sure to apply the general journal entry payments to the appropriate customer open balance amount (invoice or general journal entry amount)
If desired, double-check any reports and accounts to see how they are affected by these journal entries. Now that you’ve seen how it works, go ahead and delete each of the 3 general journal entries.
- In Quickbooks, select Company, Make General Journal Entries.
- Click Previous to return to your sample entry.
- Select Delete General Journal Entry from the Edit menu.
- Do this for each of your sample entries.
- The transactions are now cleared from your journal, the customer account, and your deposit screen.
- Log into CM/MZ and delete the sample payment, invoice, and sales receipt.
- You should be ready to export now on a regular basis
Pre-requisite to Exporting QuickBooks Journal Entries:
When exporting journal entries for QuickBooks you must ensure that member names match exactly to the name in QuickBooks. NOTE: If you are running a QuickBooks Transactions export, it is not necessary to perform this step as you will be able to export member and member contact information for comparison. Use the following procedure to review member names prior to performing the export:
- Select Reports in the left-hand navigation panel.
- In the Report Finder type in the search box “Update”.
- Select the Member Update Activity report.

Generate the report for the same date range that you will use for your journal entry export and select Change Type = Member Company Name.
Compare the results of your report to the names in your QuickBooks software. Correct differences as needed prior to importing the file to QuickBooks.
Perform Export
- Click Billing in the left-hand menu.
- Click on the Reports tab.
- Under Executive click on either Journal Entry Export – Accrual Basis or Journal Entry Export - Cash Basis

- Accrual Basis – will display ALL possible transactions that match the selected filter options.
- Cash Basis – will display ONLY Payments and Receipts that match the selected filter options.
- Enter the date range for which you wish to export. Exporting should typically be done for the previous day(s) – not the current day. This will ensure that all transactions are included for the date or date range specified.
- Click Refresh Report.
- Make any desired filter option selections.
- Deposit Options:
- Exclude Deposit Transactions: If you received funds into Undeposited Funds, and then made a deposit in CM/MZ, select Exclude Deposit Transactions if you want to perform the deposit in QuickBooks. Your payments and receipts will then be displayed in the QuickBooks Banking, Make Deposits menu so you can create a lump sum deposit in QuickBooks and include other monies as well if desired.
- Show Deposit Transactions Individually: If you received funds into Undeposited Funds, and then made a deposit in CM/MZ, select Show Deposit Transactions Individually if you want this deposit brought through to QuickBooks. Your total deposit amount will be posted as a journal entry in your bank account in QuickBooks. *note - Follow-up in QuickBooks by clearing out the “in and out” transactions in the deposits screen. Select Banking, Make Deposits, and create a $0.00 deposit that includes both the positive payment amount and the negative deposit amount displayed.
- Route Directly to Deposit Accounts: If you received funds into Undeposited Funds, and then made a deposit in CM/MZ, select Route Directly to Deposit Accounts if you’d like to bypass the Undeposited Funds account and deposit directly in your bank account in QuickBooks. You will not be able to perform a deposit in QuickBooks, instead, the individual payment amounts will be posted as a journal entry on your bank account in QuickBooks and on the appropriate customer account in Accounts Receivable.
- Deposit Options:
- To ensure you don’t export a transaction multiple times, make sure the check box “Save Export Batch” is selected.
- Browse the transactions for any missing account assignments or anything unusual. If any transaction does not look right do not import until the transactions have been corrected in the billing module.
- For the Format Option if you are exporting journal entries select Quickbooks (IFF) OR if you wish to export transactions select QuickBooks Transactions (IIF). If you have chosen to export transactions you will also choose the Customer Info to export.

- Click Export.
- Save the file to a location you will remember so that you can import it to QuickBooks.
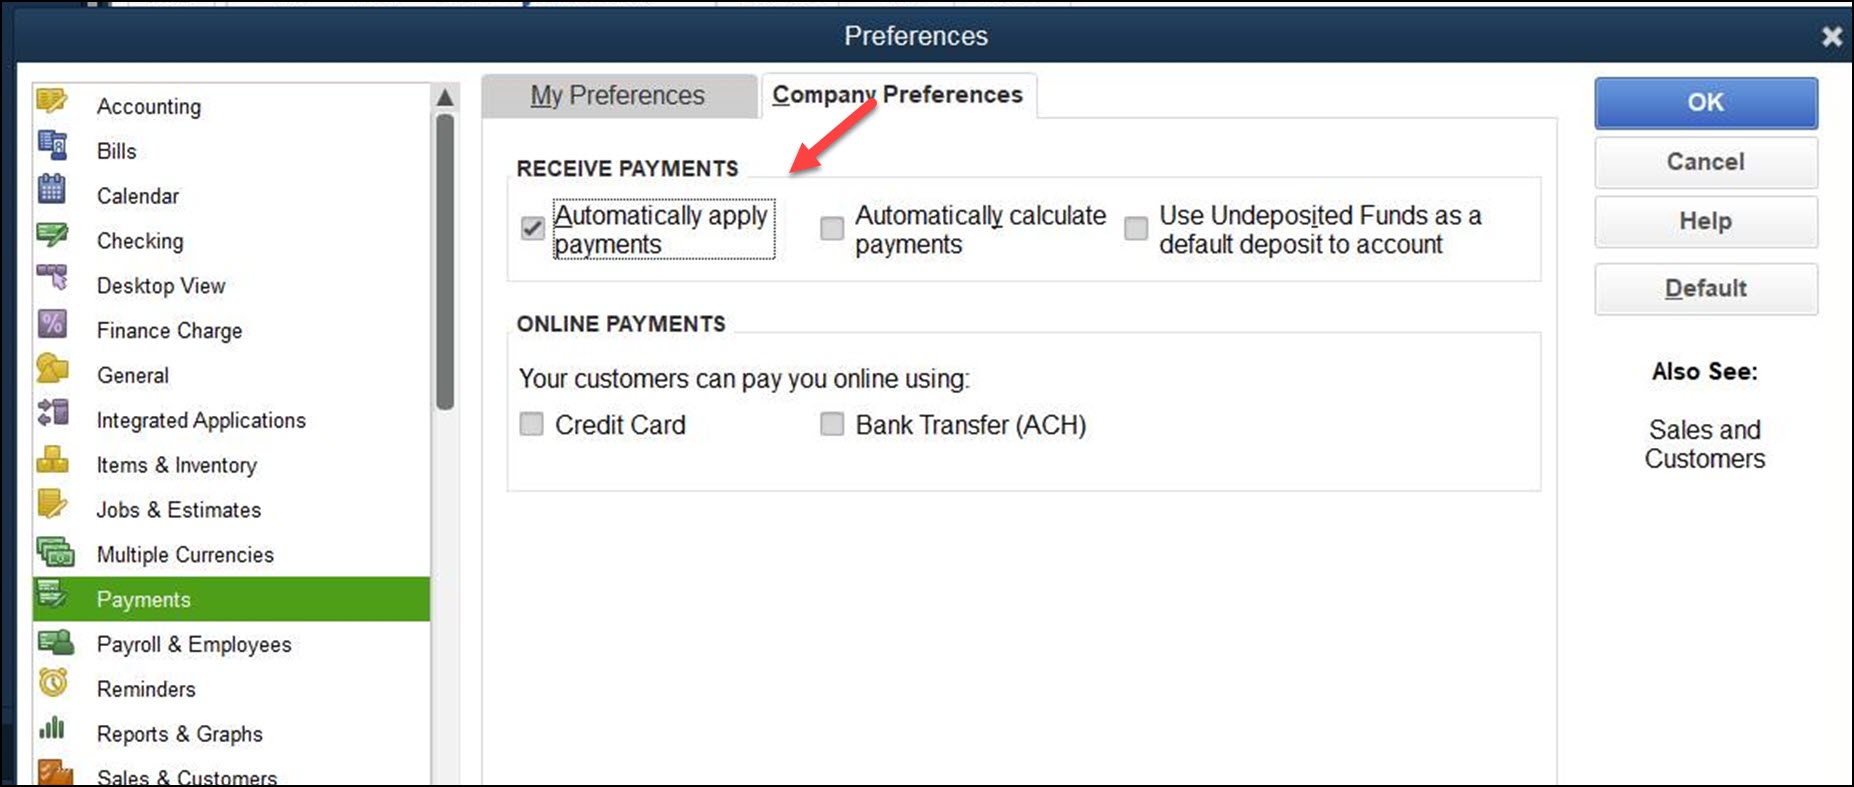
Automatically Apply Payments - Quick Books Desktop ONLY
In Quick Books Desktop you can enable the option to apply a payment from a client toward an outstanding invoice in that client's name. Turning on this option will cause QuickBooks to apply a payment from a client toward any outstanding invoices in that client’s name. If there is more than one invoice, QuickBooks will apply the payment to the oldest invoice first. How to find the setting in QuickBooks Desktop: Edit Preferences - Payments, Company Preferences - remove the checkmark from Automatically apply payments. Refer to QuickBooks help documentation for further details.
Import Journal Entries to QuickBooks
- Login to Quickbooks as an Administrator and make sure you are in Single-User Mode.
- Quickbooks Administrator – the person who sets up the company file and assigns passwords/access privileges to other users. If there is an Administrator setup, it appears in the User List as either Admin or User Name (admin). To view your user list go to Company Menu, click Set Up Users and Passwords, then click Set Up Users.
- Single-User Mode – Quickbooks must be in single-user mode in order to import. To place Quickbooks in single-user mode, if others are working with the company file, ask them to either close the file or exit Quickbooks. Then go to File and click Switch to Single-User Mode.
- Select File, Utilities, Import, IIF Files
- Locate the saved export and select.
- Your Import will take place
- View Imported Journal Entries by selecting Company, Make General Journal Entries.
Find out what record caused the error.
- When you get the first error click okay then cancel on the 2nd one.
- In QuickBooks, go to Reports > Accountant and Taxes > Journal.
- Modify the report
-
Put in the date range of the export
-
Filters Tab > Type is transaction Type > Next filter over would be Journal > Okay
-
- Refresh the report.
- The very last person on the list is the last person that came in successfully
- Go to ChamberMaster and pull up the Journal Entry Export report for that same date range.
- Find the last person that imported successfully and look at the next one on the list. This record is the one that is causing the error on your import.
Now that you know what record caused the error you need to identify the problem. It could be an issue with the name on the record. If the record isn't a customer they could exist as a Vendor or on the Other Names list. To work through these the best thing to do is change the name in QB by adding a -v at the end of the name. Once the issue is resolved you will need to go into ChamberMaster and re-export the records that weren't imported starting from the failed to the end.
After Import, Open Invoices still Showing in QuickBooks? Apply Payments in Open Amounts in Quickbooks
When you first run your Journal Entry Exports for the first few months you will need to apply the payments to the correct invoices in Quickbooks in order for the invoices to not show as open anymore. Customer and Receivable reports would typically be viewed in ChamberMaster/GrowthZone. However, if you desire to view these reports using QuickBooks, you may want to apply payments to the open amounts in QuickBooks.
General journal payments posted on the customer account will properly decrease the customer balance. However, the payment is not applied against any particular invoice (open amount) since it is a general journal entry; it will still show an open amount in QuickBooks.
Here is one example of how to apply the payment against an open amount:
- In Quickbooks, select Customer, Receive Payments
- Select the desired customer in the Received From drop-down list
- A list of “outstanding” invoices will be displayed. Click the invoice that should have the payment applied.
- Click the Discount & Credits button.
- Click the Credits tab (If applicable)
- Make sure the desired “credit” (your payment from the import) is selected.
- Click Done.
- Click Save & Close.

