ChamberMaster/GrowthZone will be the place for viewing and reprinting member transactions. QuickBooks is just recording a journal entry and doesn’t actually contain the invoice or payment. For details on QuickBooks Online, see QuickBooks Online Import.
It’s always a good idea to test out sample transactions before importing a large number of entries. Before creating any other transactions for the day, go into the Billing module and create a couple of sample entries.
Exporting Sample Entries
- Create an individual invoice, a payment for that invoice, and a sales receipt in the Billing Module.
- Make sure to choose a member who exists in your Member database and also as a QuickBooks customer. The QuickBooks Customer name needs to match the Member database name exactly.
- Remember the transactions you create, because you will delete them when you are done testing.
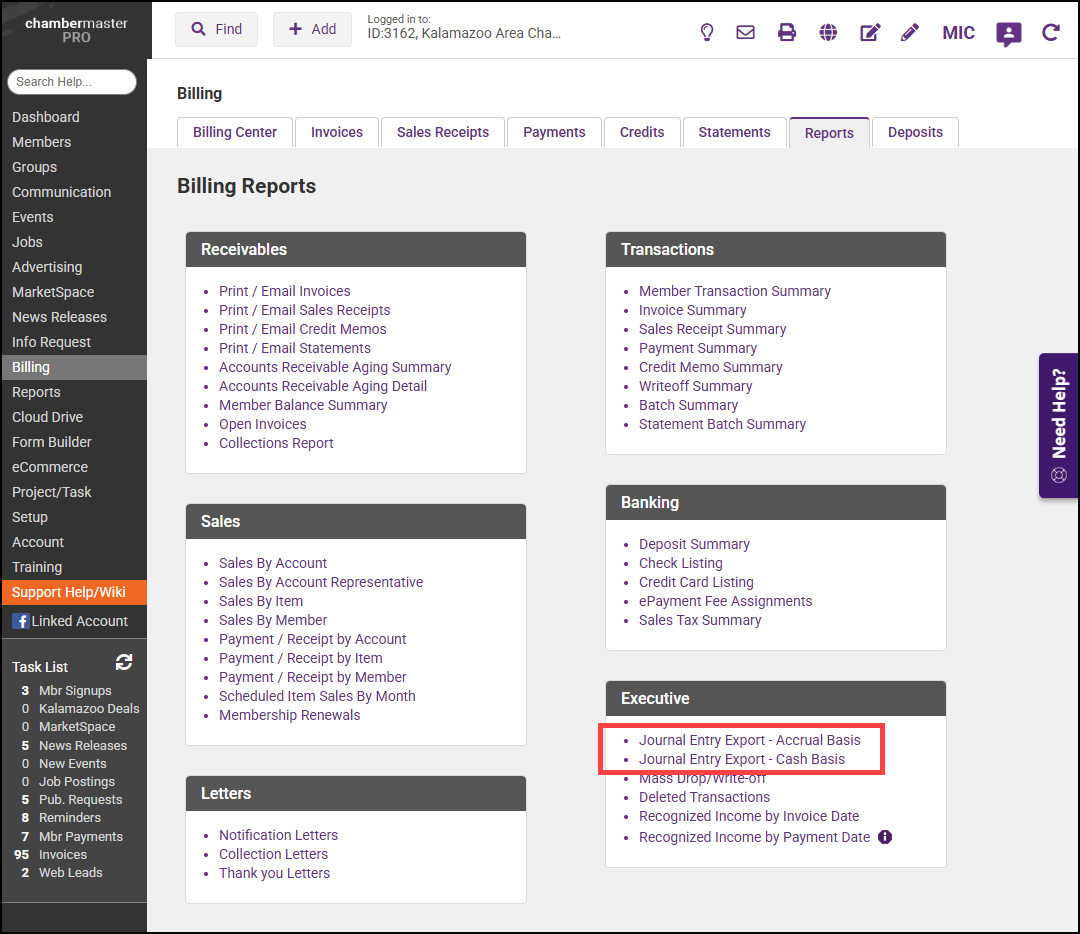
- In Billing, go to the Reports tab. Under Executive, click on either Journal Entry Export – Accrual Basis or Journal Entry Export – Cash Basis.
- Accrual Basis – will display ALL possible transactions that match the selected filter options.
- Cash Basis – will display ONLY Payments and Receipts that match the selected filter options.
- You should see your transactions. If not, click the Refresh button.
- Note the Account Names that are being referenced. These are the general journal entries that will be made in your accounting software.
- For the Format Option, select QuickBooks Online.
- If needed, deselect any transactions that are not part of your sample entries.
- Click Export.
- Click Continue.
- Type 'yes' to confirm and click Continue.
Removing Sample Entries
If desired, double-check any reports and accounts to see how they are affected by these journal entries. Now that you’ve seen how it works, go ahead and delete each of the 3 general journal entries.
- In QuickBooks, select Company, and Make General Journal Entries.
- Click Previous to return to your sample entry.
- Select Delete General Journal Entry from the Edit menu. Do this for each of your sample entries.
- The transactions are now cleared from your journal, the customer account, and your deposit screen.
- Log in to CM/MZ and delete the sample payment, invoice, and sales receipt. You should be ready to export on a regular basis.
Exporting should typically be done for the previous day(s) – not the current day. This will ensure that all transactions are included for the date or date range specified.
- Run a Member Update Activity report to reconcile any name changes (compare this report to your QuickBooks to make sure company names have not been changed and they match customer names).
- Go to Reports on the left-hand side.
- In the Report Finder, locate the Member Record Updates Report.
- In the Billing module, select the Reports tab.
-
Under Executive, click on either Journal Entry Export – Accrual Basis or Journal Entry Export - Cash Basis.
- Accrual Basis will display ALL possible transactions that match the selected filter options.
- Cash Basis will display ONLY Payments and Receipts that match the selected filter options.

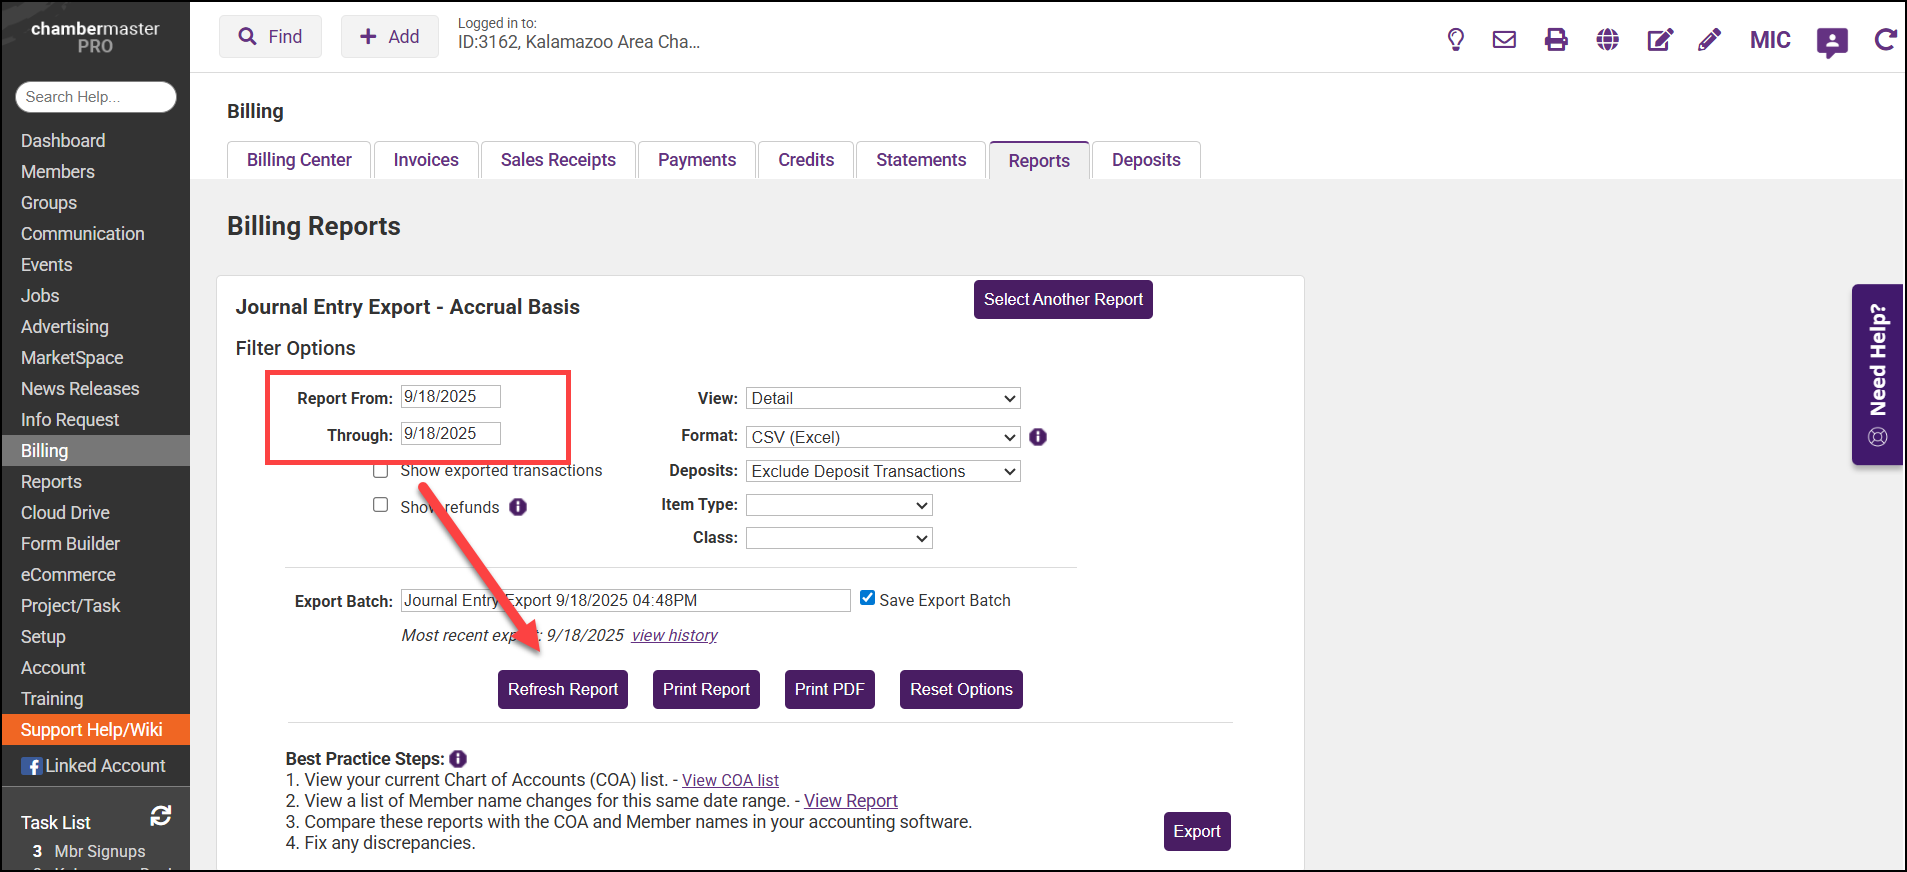
- Specify the proper date (or date range) and click Refresh Report.

-
Make any desired filter option selections:
- Route Directly to Deposit Accounts: If you received funds into Undeposited Funds and then made a deposit in CM/MZ, select Route Directly to Deposit Accounts if you’d like to bypass the Undeposited Funds account and deposit directly in your bank account in QuickBooks. You will not be able to perform a deposit in QuickBooks; instead, the individual payment amounts will be posted as a journal entry on your bank account in QuickBooks and on the appropriate customer account in Accounts Receivable.
- Show Deposit Transactions Individually: If you received funds into Undeposited Funds and then made a deposit in CM/MZ, select Show Deposit Transactions Individually if you want this deposit brought through to QuickBooks. Your total deposit amount will be posted as a journal entry in your bank account in QuickBooks. *Note - Follow-up in QuickBooks by clearing out the “in and out” transactions in the deposits screen. Select Banking, Make Deposits, and create a $0.00 deposit that includes both the positive payment amount and the negative deposit amount displayed.
- Exclude Deposit Transactions: If you received funds into Undeposited Funds and then made a deposit in CM/MZ, select Exclude Deposit Transactions if you want to perform the deposit in QuickBooks. Your payments and receipts will then display in the QuickBooks Banking, Make Deposits menu, so you can create a lump sum deposit in QuickBooks and include other monies as well if desired.
-
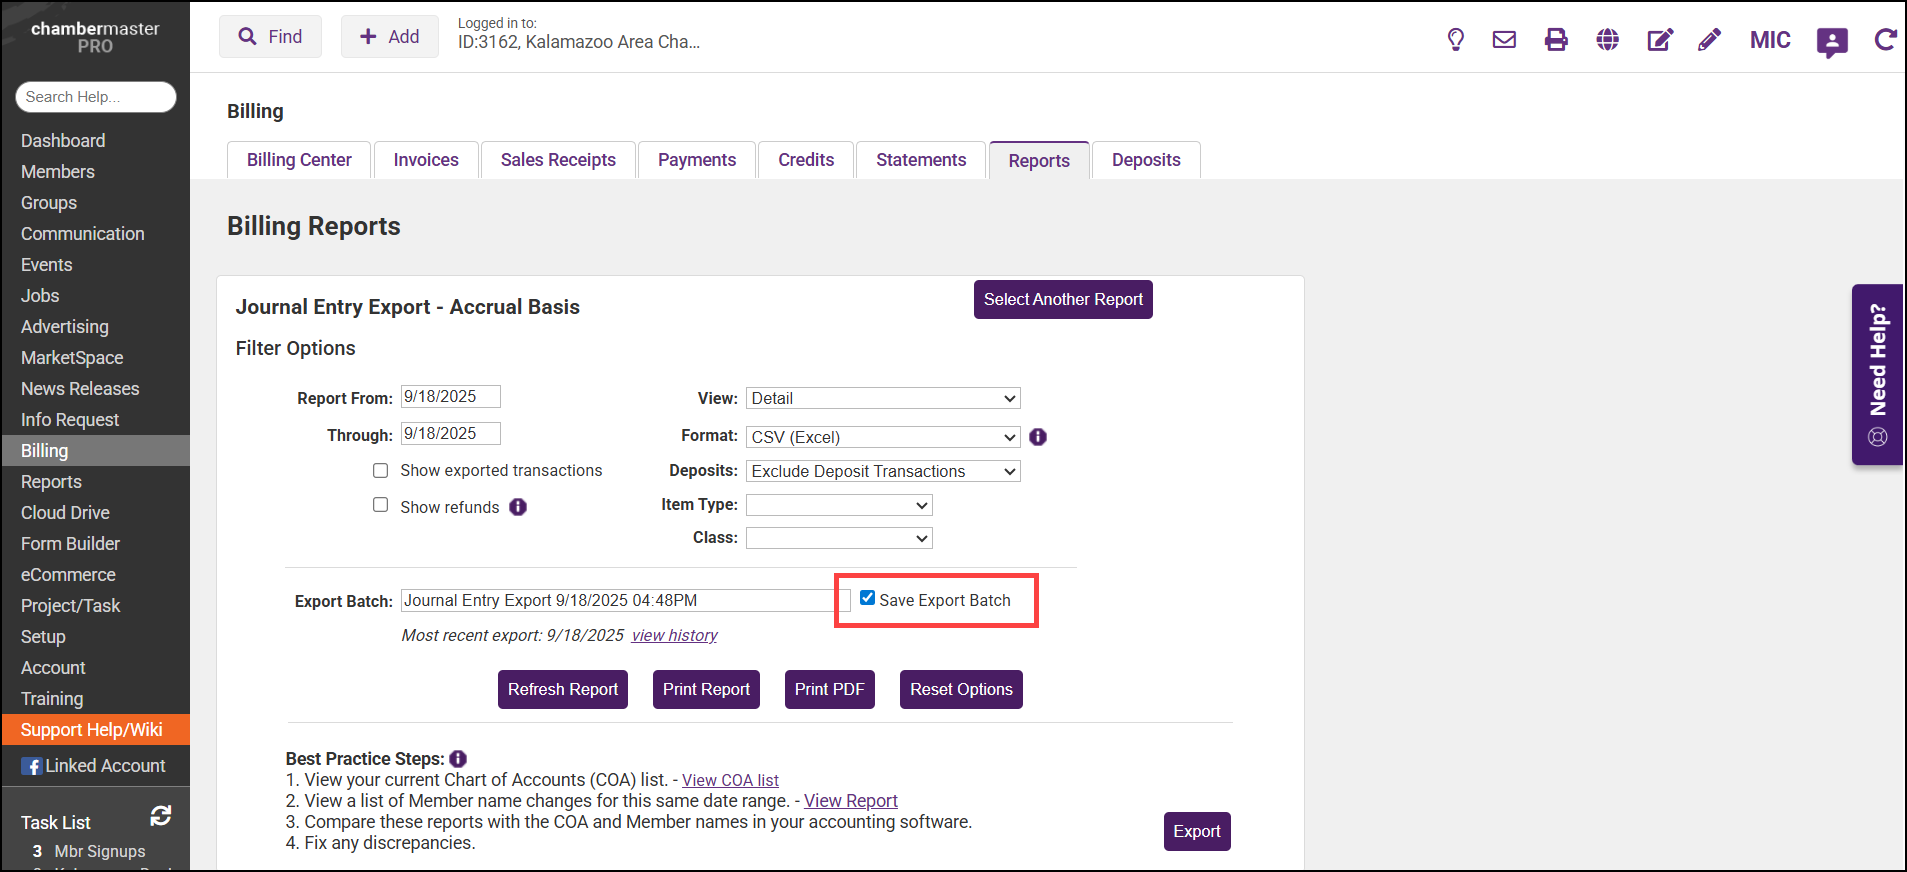
To ensure you don’t export a transaction multiple times, make sure the check box Save Export Batch is selected.

-
Browse the transactions for any missing account assignments or anything unusual. If any transaction does not look right, do not import until the transactions have been corrected in the Billing module.
-
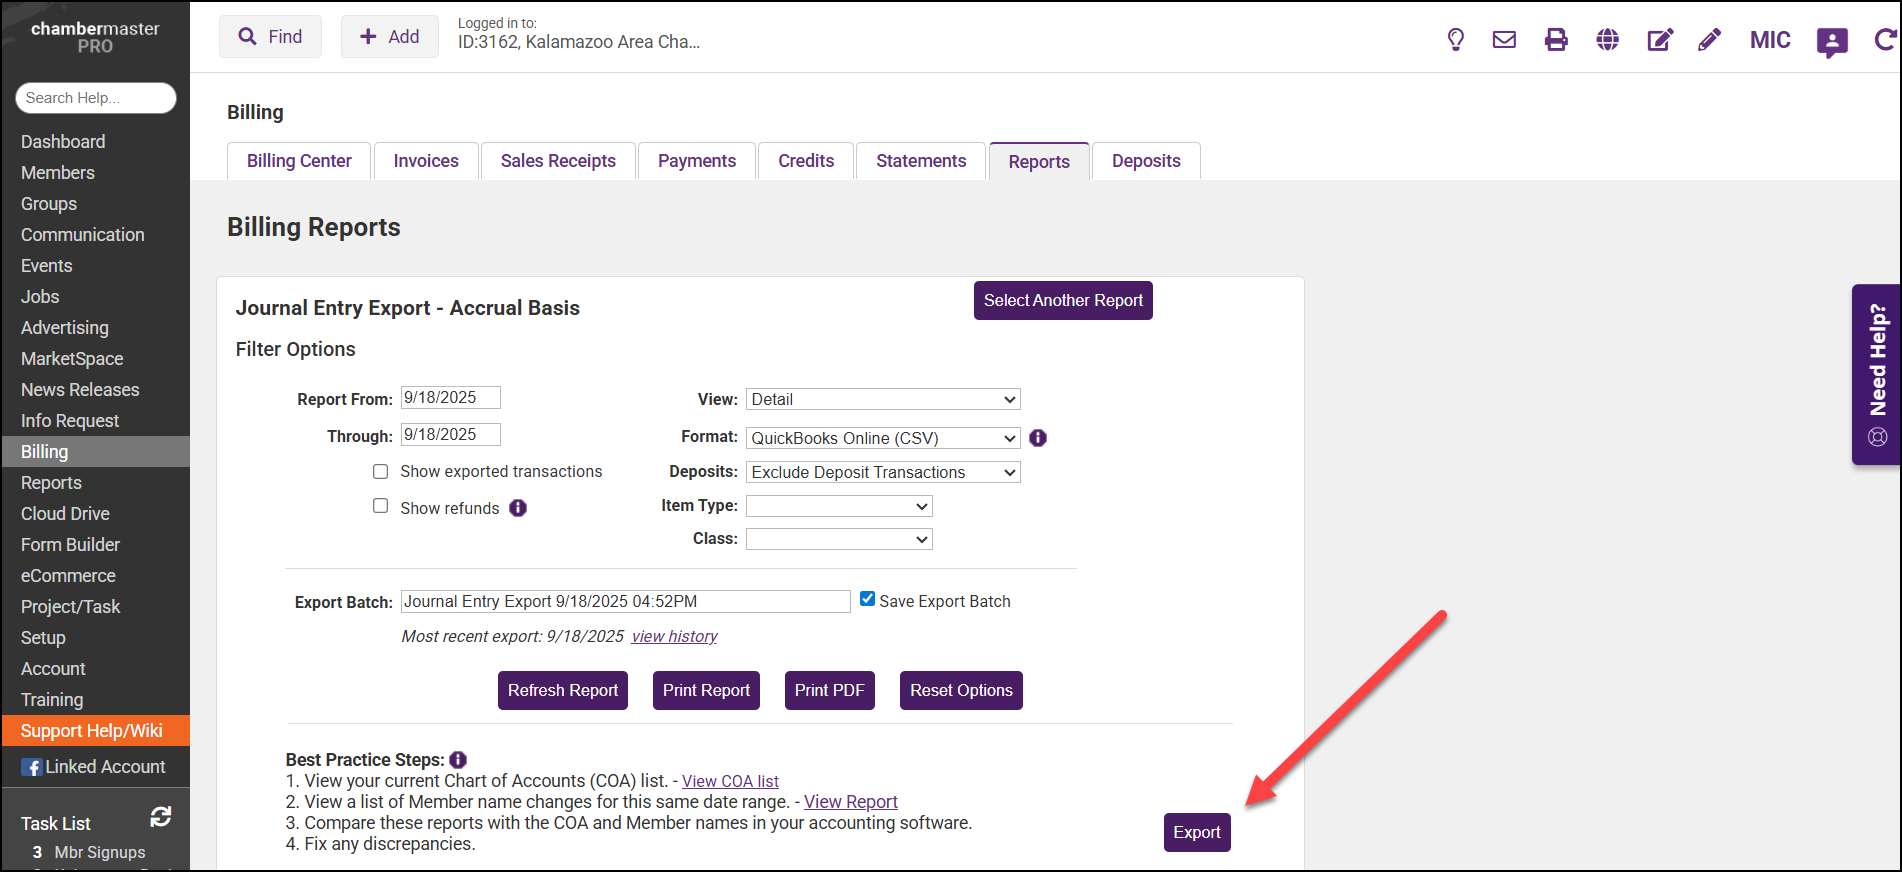
For the Format Option dropdown menu, select QuickBooks Online.
-
Click Export.

Click here to view a video on applying payments with QuickBooks Online.


