
With your ChamberMaster/MemberZone software, the Email Designer provides you the ability to create and design your own newsletters and email templates. The Email Designer is extremely flexible and provides tools for basic content elements that you can use to create and design your newsletter. Your content will look great on all devices, browsers, and email clients. We have included several templates for you, that you can update and customize as needed. Or you can start from scratch and create your templates. Click here to view the latest Email Designer webinar or see the Email Designer in action.
|
|
NOTE: The Email Designer is an Add-on feature for those with Plus, Premier, or Pro editions. For pricing information, please reach out to our Account Management Team. |

Sending Your Newsletters
-
Click Communications in the left-hand navigation panel.
-
Click New Email to Multiple Members.
-
Select desired recipients.
-
Click Edit with Email Designer.
View Default Newsletter Templates
- Click Communications in the left-hand navigation panel.
- Click Create Email Designer Email.
-
- Select the template you wish to view from the Template list.

Template Body
Using the Body option, you can define the global settings for your templates, including the width of the template, the background color, default fonts to be used, link color, etc.

Standard Tools
Tools are basic content elements that are used to design your templates. Text, Image, and Button are some examples of built-in tools. To start using these tools, you will simply drag them into your newsletter to add content. Content formatting options are displayed when a tool is added to your document.
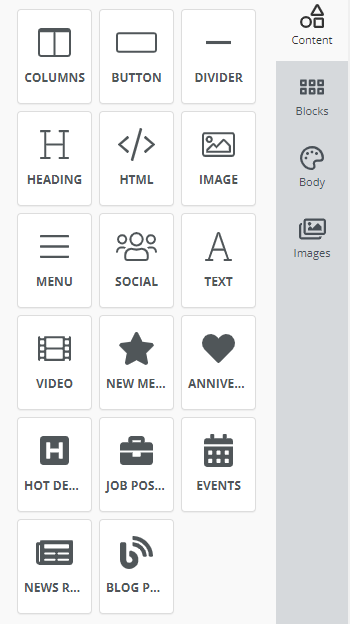
Columns
Rows and columns make it easy to organize content elements, like images and text. When getting started with designing your newsletter, you may wish to use the column tool to add columns and rows first, so you can then add additional content in just the right place. Drag & drop the Column tool into your template. You will then be able to define the number of columns in each row. Add as many rows as needed, you will always be able to go back and remove rows or change the number of columns you have added to the rows.
|
|
The Text tool allows you to add the text block to your newsletter. Simply drag and drop the block into your newsletter, and type your text. Standard word processing functions are available, such as font size, alignment, etc, are available for formatting your text. The ability to insert merge fields allows for further customization, such as the recipient's name or organization. |
TIPS:
- Ensure your text is easy to read and avoid the pitfalls of using background or font colors that make your text difficult to read.
- A variety of fonts are available for your text, however, stick to standard web-safe fonts, such as Arial, Verdana, Georgia, Times New Roman, and Courier. Not all fonts are supported universally, so if you’re using something niche, you may be at the mercy of having the email platform it’s displayed on change it to something else—which could potentially affect spacing, layout, and the overall look.
When working with the text tool, you can insert merge fields for further customization. Member and representative fields are available.
- Drag & Drop the text block into your newsletter.
- If needed, begin typing your text.
- Place your cursor where you would like to insert the merge field.
-
- Click Merge Tags and select the desired tag.

Add a Header to your Newsletter
|
|
Adding a Header to your newsletter. |

Drag & Drop the Header block into your newsletter, then click the block to:
- Select Heading type, Font Family, Font Size, Color, and more formatting options:

Image Tool
|
|
A newsletter full of text can be very boring to look at, and images can be a great way of communicating what you're about to your readers. Images can help readers connect with the content of your email and can keep their attention focused on the right area. Use the Image tool to add images to your newsletter. Simply drag & drop the image tool into your newsletter template, then upload your image and format it as needed. |
TIP:
- Because some email clients don’t display background images, ensure that your email looks good and works without images. Enter a short image description in the Alternate text field to describe any images you use so that even with images disabled, the newsletter will still make sense.
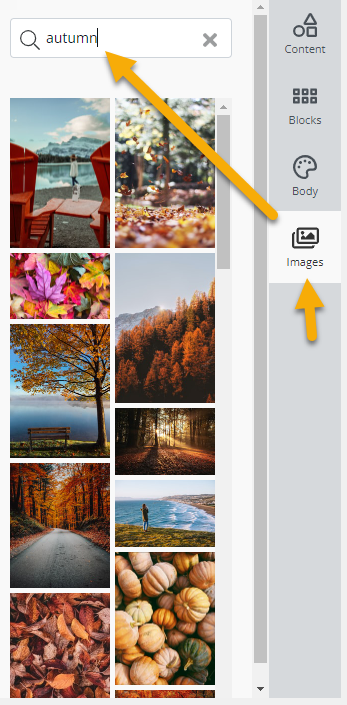
- A variety of stock images are also available for you to use. Click the Images icon, to choose an image, and drag & drop it into your newsletter.
|
|
Videos embedded in your newsletter are a dynamic way to engage your readers. Using the Video tool, you can include a YouTube or Vimeo URL to automatically generate a preview image. The image will then link to the provided URL. |

HTML Tool
|
|
The HTML tool allows you to add custom HTML content to your template. We recommend that only users familiar with HTML use these blocks since adding custom code to the template can affect its rendering and responsiveness. Once you have added the HTML block to your newsletter, the default code "Hello world!" is displayed, click on the content block to add your HTML code. You can write your own HTML or paste in existing HTML in the code editor, then click Save Code to return to the email template. As you enter your code, an immediate preview is displayed in your newsletter. |
|
|
The Divider tool allows you to add styled horizontal lines that divide your content. This will help organize and add visual content to your newsletter. Drag and drop the tool into your newsletter, then click anywhere on the divider to open the editing tool. You will be able to change the thickness, length, and padding of the divider lines. |

Button Tool
|
|
The Button tool can be used to drive your readers to action. Perhaps you want to send the reader to your events page, or even a fundraiser page. By using this tool you can send the reader to these external links. Alternately, buttons may be used to send an email, dial a phone number, or even send an SMS. Drag & Drop the button onto your newsletter, then you will be able to style to button and configure the desired action. |

Custom Tools
We have provided tools custom to your association. You can include a list of your new members, a list of upcoming events, lists of hot deals, etc.
|
|
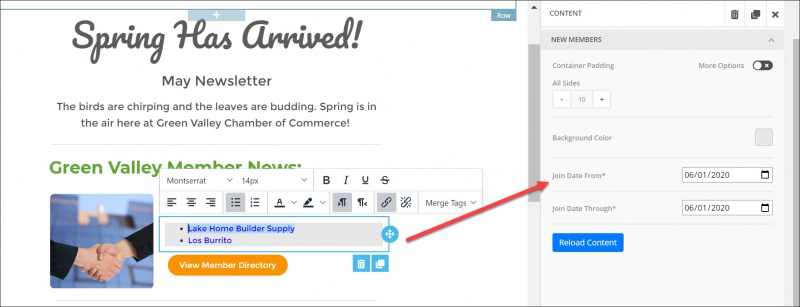
The New Members custom tool allows you to easily put the spotlight on your new members. You will be able to define the members displayed based on a join date range. |
Drag and drop the new members block into your newsletter, then configure:
- The join date range
- Set container padding - this is the space that will surround the list
- The order in which you would like the members to display
- Your members will be displayed as a bulleted list, with hyperlinks to the member directory. Feel free to edit the block and remove the bullet points or format them in your desired way. NOTE: Any formatting you apply yourself after the members are loaded would be lost if you needed to reload the member list again for any reason (such as changing the date range).
Add a List of Member Anniversaries to Your Newsletter
|
|
Recognize your longtime members by using the Anniversary block. |
Drag & Drop the Anniversary block into your newsletter, then click the block to:
- Select the anniversary and years of membership
- Use the text editor options to format your text, and add additional verbiage, and other pertinent links. Note: Any formatting you apply yourself after the anniversaries are loaded would be lost if you needed to reload the list again for any reason (such as changing the month and years.
|
|
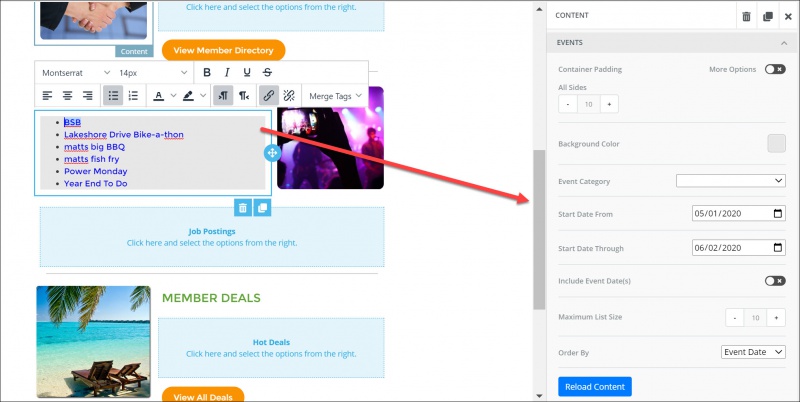
Promote your events using the Upcoming Events custom tool. Once included in your newsletter/email, recipients will be able to view event details and link to the event page and registration page. |
Drag & Drop the Events block into your newsletter, then click the block to:
- Select the event date range to be included in your newsletter
- Select the Event category if desired; leaving blank will select all event categories.
- Select whether to include the event date or not.
- Use the text editor options to format your text, and add additional verbiage, and other pertinent links. Note: Any formatting you apply yourself after the upcoming events are loaded would be lost if you needed to reload the list again for any reason (such as changing the date range).
Add a List of Job Postings to your Newsletter
|
|
Promote your members' job listings by using the Job Posting block. |
Drag & drop the Job Posting block into your newsletter, then click the block to:
- Enter the active date of the job postings that you’d like to include in the newsletter.
- Choose whether to include the Member Name and category.
- Set a maximum number of job postings to display if the results on the selected active date range would be exceeded.
- Select to Order by Job Posting Title, Member Name, or Category.
- Use the text editor options to format your text, and add additional verbiage, and other pertinent links. Note: Any formatting you apply yourself after the job postings are loaded would be lost if you needed to reload the list again for any reason (such as changing the active date).
|
|
Promote your members' hot deals by using the Hot Deals block. |
Drag & drop the Hot Deals block into your newsletter, then click the block to:
- Select the Public Active Deals As Of. The Hot Deals included in your newsletter will be those active beyond this date.
- Choose to include the member's name in the newsletter.
- Choose to include the hot deal valid dates
- Define the maximum number of hot deals to be included
- The order in which you wish the hot deals will be displayed.
- Use the text editor options to format your text, add links, and merge fields
|
|
Get more from your news releases by including them in your newsletter. |
Drag & Drop the News Release block into your newsletter, then click the block to:
- Enter the active date of the News Release that you’d like to include in the newsletter.
- Choose whether to include the Member Name and Release Date.
- Set a maximum number of News Releases to display if the results on the selected active date range would be exceeded.
- Select to Order by News Release Title, Member Name, or Release Date.
- Use the text editor options to format your text, and add additional verbiage, and other pertinent links. Note: Any formatting you apply yourself after the News Release is loaded would be lost if you needed to reload the list again for any reason (such as changing the active date).
|
|
Blogging is a great way to promote your chamber, increase traffic to your chamber website and help inform the community. Use the Blog tool to add your blogs to your newsletter. |
Drag & Drop the Blog block into your newsletter, then click the block to:
- Select Blog posts from/through dates
- Select if you wish to include the blog Post Date
- Select if you wish to include the blog Post Summary
- If you need to restrict the lists of posts displayed, you can adjust the Maximum List Size option
- Use the text editor options to format your text, add links, and merge fields. Note: Any formatting you apply yourself after the News Release is loaded would be lost if you needed to reload the list again for any reason.
Add a Menu to your Newsletter
|
|
Adding a menu helps the reader to locate areas of interest quickly. |

Drag & Drop the Menu block into your newsletter, then click the block to:
- Select Heading type, Font Family, Font Size, Color, and more formatting options:

Add Social Networks to your Newsletter
|
|
Adding social network icons and links. |

Drag & Drop the Social block into your newsletter, then click the block to:
- Select Icon type, social links, and more formatting options:

Copy/Duplicate a Block
- Click the block you wish to copy.
- Click the
 icon. A copy of the block will be placed directly below the original block.
Move a Block
- Click the block you wish to move.
- Click the
 icon.
icon. - Drag the block to the desired location.
Delete a Block
- Click the
 icon.
icon. - Confirm that you wish to delete the block.

