
Create Event Invoices Using Integrated Billing Module
If a payment method of Invoice is selected, this invoice will be queued and then created at a time of your choosing. If a payment method of Credit Card is selected, one of three results will happen depending on your choice: an invoice and payment will be automatically created, a sales receipt will automatically be created, or no transaction will happen. Make these selections for each event on the Fees tab of the desired Event.
Event invoices may be created from within the Events module or from the Billing module. Either way of creating invoices accomplishes the same task.
- In the Event Module, select the desired event.
- Click the Account tab.
- If there are invoices to be created, the Create Invoices Now button will be displayed. If the Create Invoices Now button does not appear, there are no invoices to be created at this time.
- Click Create Invoices Now.

- Make any desired selections in the Bill To: which allows you to specify to whom the invoice should be addressed, and which items should be on the invoice line. box for who the invoice should be addressed and what items should appear on the invoice line.
- If you wish to apply any available credits a member may have available on their account, click Auto-apply available credits on invoices checkbox.
- If desired, select a Message that will be printed on each invoice. Note: Click edit to modify the message or create a one-time custom message to display on all invoices.
- Complete the rest of the fields including Invoice Date, Date Due, and Payment Terms.
If New Batch:
If Match Found:
- In the list of invoices, uncheck any invoices that should be excluded from this Batch.
- Note: All excluded invoices may be added to this batch later.
- Click Deliver Customer Invoices.
- Click Save Batch or Deliver Invoices. If clicking Save Batch, you can return to a batch of invoices at any time to deliver them (email or print them). If clicking Deliver Invoices, continue to the next step. Either choice, Save Batch or Deliver Invoices, will create the batch of invoices. Deliver Invoices will create the invoices and immediately open a window with options to print and/or email the invoices.
- If you have selected Deliver Invoices the Deliver Customer Invoices window will appear. The Delivery Method of Print Invoices is already selected. Those invoices with an Output selection (from the previous window) of Print or Both will be selected. Those invoices with an Output selection of Email or None will not be selected. Also, any invoice that does not have complete mailing address information will not be selected.
- NOTE: Changes made to the Contact Name or address on the Deliver Customer Invoices window do not modify the Member’s Account information. Permanent Billing Rep or address changes must be made in the Members module.
- Complete the Delivery Method selections as desired
- Note: A default Invoice Template may be selected as desired by clicking Setup > Billing Options and Settings. Open the ''Appearance'' area and select a new ''Default Template''. The templates may also be edited at this location. See “Invoice Templates” for more information.
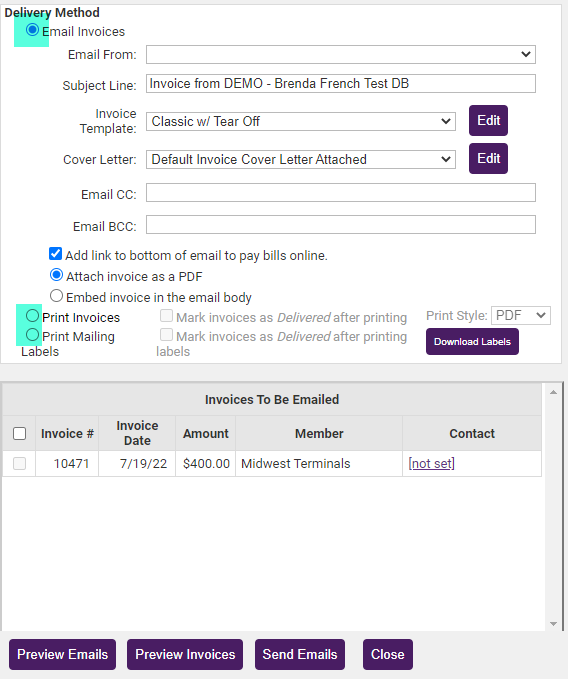
- When ready, click Preview Invoices or Print Invoices.
- Suggestion: Click Mark invoices as Delivered after printing when printing the labels. (if not printing labels, click Mark invoices as Delivered after printing when printing the invoices). This will make it easier to determine later if the invoices in that batch have been printed or not. Later, the selection Print/Email Invoices on the Reports tab will easily identify any outstanding invoices that have not been “delivered”, regardless of which batch they belong to.
- If mailing labels are desired, click Print Mailing Labels in the Delivery Method section.
- Note: When viewing the Member's Account tab after billing: The Next Billed column in the Membership Fees and Dues area reflects the name of the monthly batch that this fee/due will be included in or already has been included in. This column will automatically display the next billing month when the current date passes that month. For instance, if the current date is February 2015 and a fee/due is set to be billed in February 2015, the Next Billed column will display February 2015 until March 1, 2015; then it will automatically switch and display February 2016. To see if a particular fee/due has been billed, refer to the transactions displayed in the Transaction History area.
- Make the desired selections.
- Click Print Labels.
- If any invoices need to be emailed, click Email Invoices in the Delivery Method section.
- Make the desired selections.
Individual invoices may be generated for members from the Events module for those requesting payment by invoice or for those registrants designated as such by chamber employees when completing registration.
If registration is accepted for individuals that are not chamber members, invoices may also be generated if desired. Two options for the creation of non-member invoices are available: create a new member record for each non-member participant or assign non-member invoices to a single member.

