Click here for information on how to add a non-ChamberMaster banner ad.
Add Facebook Page Plugin to Your SmartCMS Site
- Obtain the URL of your Facebook Page by visiting it in a browser and copying the URL in the address bar.
- Open the Facebook developers plugin page - https://developers.facebook.com/docs/plugins/page-plugin
- Enter the URL of your Facebook page that you copied in Step 1 into the Facebook Page URL field and select any other desired settings.
- TIP: Leaving the height and width blank will produce a widget that will automatically adjust its size from 180px up to 500px which will fit nicely in a “sidebar area of most websites
- After you have made your selections, scroll down and click the blue Get code button. This will open a popup window with the code in it – don’t do anything with it yet, just leave it open.
- Open a new tab or window in your browser and log in to your SmartCMS website.
- Locate the area of the website where you would like the Facebook Page plugin to appear and click the Add button (plus sign) in the far right of the content area heading bar. Select the < html > source option and remove the placeholder paragraph in the window that pops up.
- Leaving that window open, go back to the tab or window you have open with the Facebook widget code and copy section 1.
- Paste the code from section 1 at the top of the new < html > source item you opened on your SmartCMS website.
- Go back to the Facebook code and copy section 2.
- Paste the code from section 2 below the code you pasted in previously and click Save.
- Check to be sure that the Facebook Widget is working as expected.
Create a Channel for Videos
We recommend hosting your videos on a web-based video hosting platform, such as YouTube or Vimeo. Both have a free service option. Using a web-based video hosting service allows you to reach a broader audience, provides an optimal viewing experience, gives you a centralized location for all your videos, and offers privacy settings.
Hosting your videos on a video hosting platform involves creating a channel for your videos. Check out these links to get started:
Google's how to create a YouTube channel.
Vimeo's how to create a Vimeo channel.
If your organization would like more video customization and statistics, you may want to consider purchasing a business plan through Vimeo, such as Vimeo PRO.
Create Module Page Custom Templates
Module Page Template
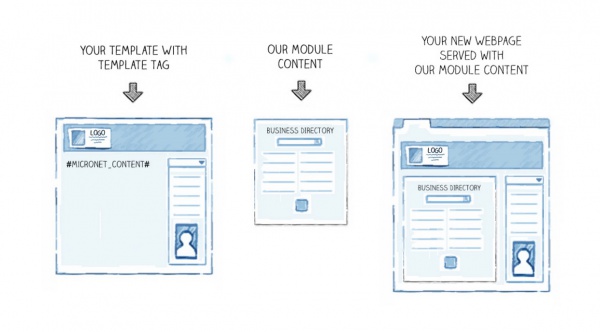
Your SmartCMS website comes with a built-in Module Page Template. By default, this template is used by all Module pages e.g. Directory, Events, Hot Deals, etc., to provide the look/feel for the ChamberMaster or MemberZone content, like below:

The default Module Page Template is located in the DO NOT DELETE section of the Manage > Menu option on your SmartCMS website. The name of the page template is Page Layout. Note that changes made to this page template will appear on all module pages by default.
Custom Templates
If you would like a different template for a specific Module, you can make a Custom Template.
- Once logged into the website, select Manage > Menu in order to create a new page.
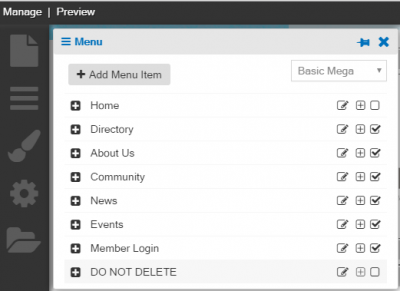
2. Click the option to add a Sub Menu Item in the DO NOT DELETE menu section.
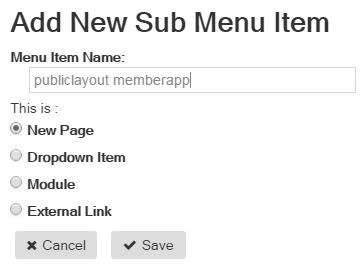
3. Create a New Page including “publiclayout’ text within the title. For example, if creating a custom Member Application template page, the title would be “publiclayout memberapp” or some identifying text so you can recognize which module page you are customizing.
- Note, the "Menu Item Name" must contain the text: publiclayout.
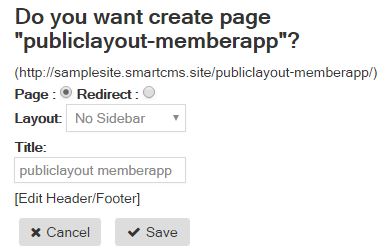
- Once you click Save, the new page options will display. Select the preferred layout option and Save once again.
- The newly created page will populate.
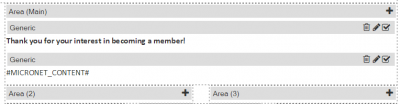
- Edit the content block that shows the page name. In the editor, replace the H1 title that automatically populated and add your desired custom text.
- Add a new content block below the custom text, called “#MICRONET_CONTENT#” to the page where you would like the Module content to populate.
- Note: you must have this on the page for Module content to display.
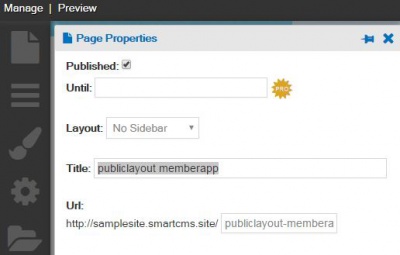
- Next, go to Manage > Page Properties in order to alter the title of the page. We recommend removing the “publiclayout yourtitle”. The Module page title will automatically populate.
- Click Save.
- Note: If not removed, such as in this case, the tab at the top of the website would read “publiclayout memberapp – Member – Your Chamber’s Name” Once removed, users will see “Members – Your Chamber’s Name”
- In a new browser tab or window, go to “yourwebsite/integration/settings” and click Module Templates tab at the top of the screen
- On the page, click Show Advanced Options to have more Module pages displayed on the screen.
- Find the Module page(s) you would like to customize.
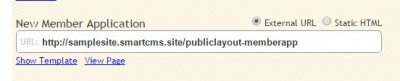
- Under the title, add the URL to the page you just created, as shown below:
- Select Save Changes at the bottom of the page, and go to the browser tab that is displaying your website.
- Navigate to the Module page and you should see your changes. If you don’t, click on the Refresh From Template button in the upper left corner, and you should see your Custom Template changes applied to your Module page as seen in the picture below: