
Adding an event may be done by clicking the Add button in the header bar menu OR by clicking the plus sign for a date, when on the Calendar tab. View the explanation video. The process will be the same regardless of the option you choose to use.
- Click Add in the header bar.
- Click Event. The Add a New Event wizard will be displayed.
-
- Configure the following General Information settings:
- Event Title: This title will display in your Events drop-down list and also on the Event page of your public website.
- Start/End Date/Time: Enter the correct dates for the event. A different end date is only needed when a single event runs multiple days – like over the weekend. NOTE: All Day Event is selected by default, deselect this checkbox if you wish to enter exact times.
- Reminder: If selected, an automatically generated reminder email will be sent using content from details on the General tab of your event. The email is sent, two days prior to the event, to all registrants on your Guest List with a status of Registered. You may change the date/time that the email is sent if you wish. NOTE: Only those with Plus or greater software versions only.
- Recurrence: An event occurring multiple times on your calendar may be duplicated by setting a recurrence. See Recurring Events for more information.
- Professional Development Hours: If you wish to include professional development hours, enter the number of hours. This is for informational purposes only, and will not tie back to a contact's information.
- Continuing Education Hours: This is an optional field to identify CEUs. This field will not track back to a contact's information.
- Goals: Enter your goals for the event. This section is optional. You will be able to monitor where you stand against your goals on the event's Advanced tab.
- Approval Status: When the event is in Approved status, it will be displayed this on all calendars marked under “Visibility”. The status of Pending or Disabled will not display on the public calendar.
- Visibility: Check the calendars on which you wish to display this event. Note: All events regardless of these check-boxes will display on the Events Calendar tab. This allows you to define who can see the event (internal, public, member).
- Internal Chamber Event Calendar: The internal calendar refers to the database calendar displayed within the Events module. Enable this option to include this event on this calendar.
- Display on Public Events Calendar: When this option is checked the event will display on your website's events calendar (if you have integrated the events public module). Additionally, it will be displayed in Upcoming Events on your public website, if you have integrated an Upcoming Events feed.
- Display on Members Only Calendar: When this option is checked the event will display on the Member Information Center after they log in. This option must be checked for the event to show on the members’ calendars in the MIC.
- Display on Featured Events: This option allows for the event to be listed as a featured event on the Featured Events list if you have integrated the Featured Events fee on your website. Click the edit featured events link to view and/or edit the events currently included on your list.
- Event Category: Select the categories to which you wish to assign the event. You may add the event to as many categories as you wish. Categories provide a way for visitors to your website to search for events. Website visitors may search for events by category on the public website. Click the edit categories link to add and/or edit available categories.
-
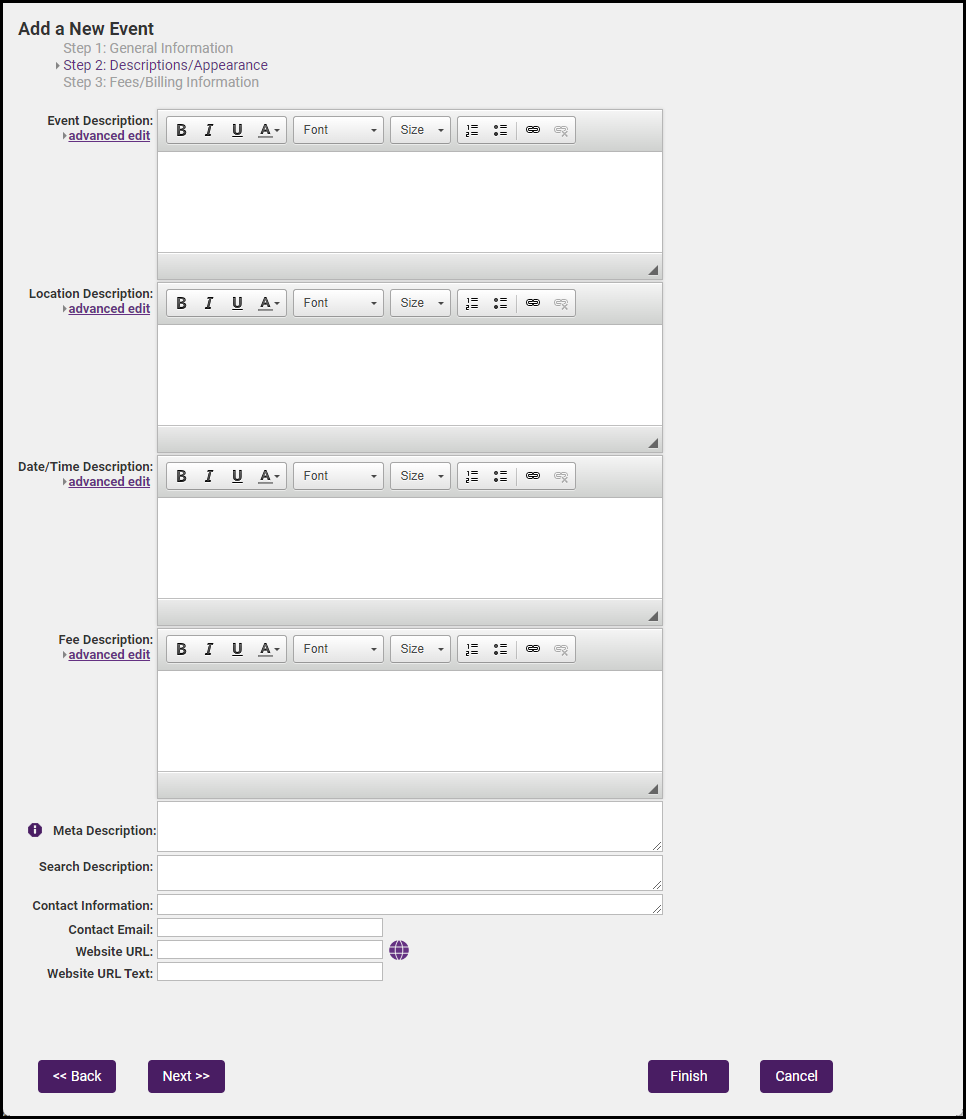
Click Next. The Description/Appearance settings will be displayed. Configure the following (all fields are optional and may be edited as needed, once the event has been saved):
- Event Description: Enter a description of the event. Click the advanced edit link to format the text as desired for display on the website.
- Location Description: Enter location details. Click the advanced edit link to format the text as desired for display on the website.
- Date/Time Description: Enter the date/time description to be displayed on the website. Click the advanced edit link for additional formatting options.
- Fee Description: Enter the fee description to be displayed on the website. Click the advanced edit link for additional formatting options.
- Search Description: Enter the description to be displayed when events are searched.
- Contact Information: Enter the name of the contact for this event.
- Contact Email: Enter the email for the contact.
- Website URL: If applicable, enter the URL to a website that provides further information about the event.
- Website URL Text: If applicable, enter text for the URL.
- Sync With Zoom: If you are syncing the event with Zoom, enable this checkbox. See HERE for more details.

-
Click Next. The Fees/Billing Information screen will be displayed.
-
Assign Fee Items: If registration fees are to be associated with this event, click Assign Fee Items. In order to be assigned, fees must first be created by someone with Finance or Administrator permissions. Fees can also be assigned later on the Fees tab of the event. NOTE: If you will be assigning custom fields to your registration fees, you may wish to assign the fee items on the event's Fees tab after the event has been created.
- Online Registration Options: If desired, select to allow members and/or non-members to register online for this event. Selecting this checkbox will immediately display the Register button on the public event page. This selection can also be turned on later on the Fees tab of the event.
-
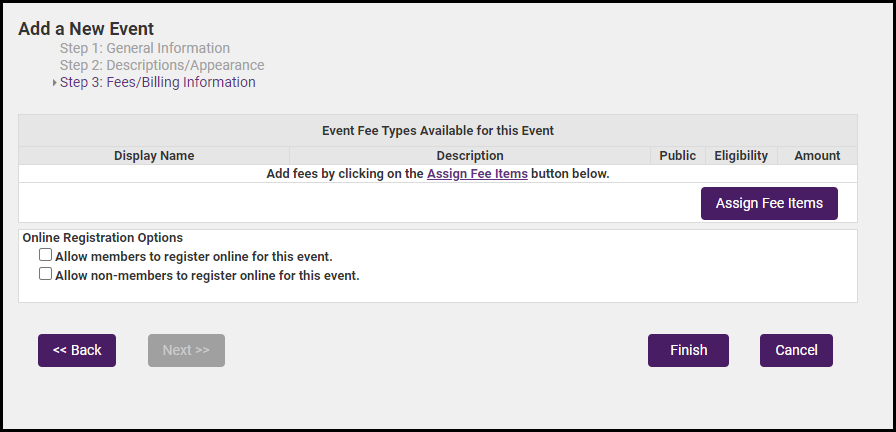
- Click Finish.
After creating a new event, work with the tabs in the order displayed. For example, after completing the General tab, set up the fees (if applicable) on the Fees tab. The Sponsor tab would be next, the Guest List, and finally the Account tab.

