
As a source of community, business, and recreational knowledge in your area, your chamber of commerce frequently handles requests to provide various information to your members and consumers. The Information Request module handles these requests with an efficient and thorough approach providing some advantages that don’t exist when performing the same tasks manually.
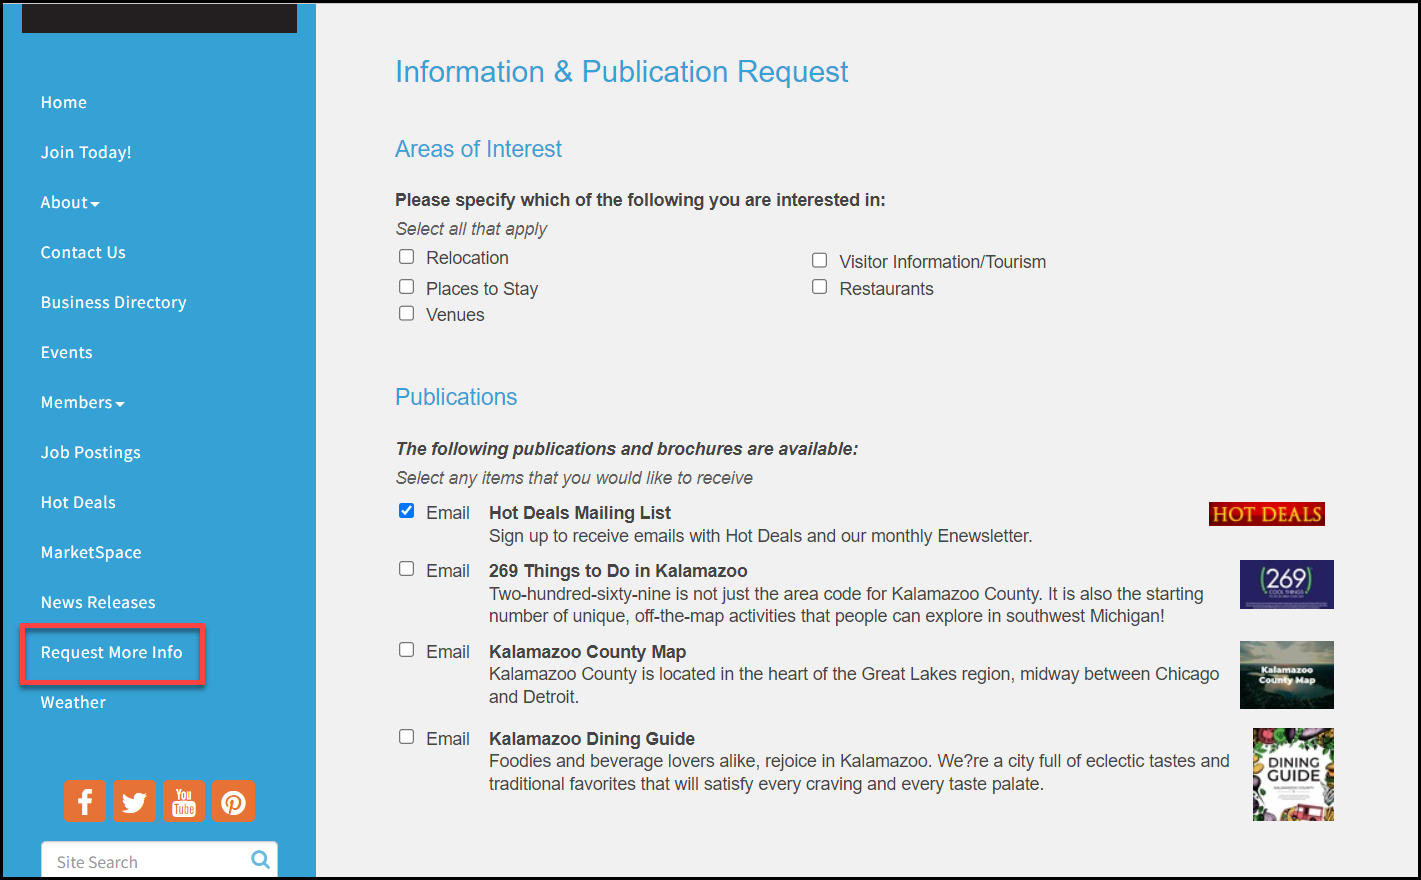
- Consumer information is recorded in a simple, fill-in-the-blank form with check boxes available to select consumer interests, desired publications, and travel plans if available.
- Consumers themselves may request information using your chamber’s local website if the Info Request module has been integrated. Info Requests can be entered via the back office by staff as well.
- Information that is available in an email format is automatically delivered to the consumer upon saving the request - no additional steps are required.
- Requests for printed literature are queued for distribution and handled at your convenience. The associated mailing labels, printed with a code, will indicate the requested literature piece that should be included in the envelope.
- Printed literature may be subtracted from the online inventory listing, which keeps a running total of brochures and publications simplifying reorders.
- By completing an information request form, marked interests, and specified travel information will generate a consumer lead that may be distributed to a targeted group of members. See Setup, Manage, and Distribute Web Leads for more information.
Information Request Setup
Info Request has many selections that are customized to your chamber, tailoring this module to your unique chamber needs. Before using the Info Request module, custom selections can be determined for:
- General consumer interests
- Publications and emails
- Consumer “Trip Purpose” options
- Consumer “Referred by” options
Once these custom options have been determined in the Setup module, consumer information can easily be captured on a fill-in-the-blank screen that is custom-designed by your chamber for your chamber.
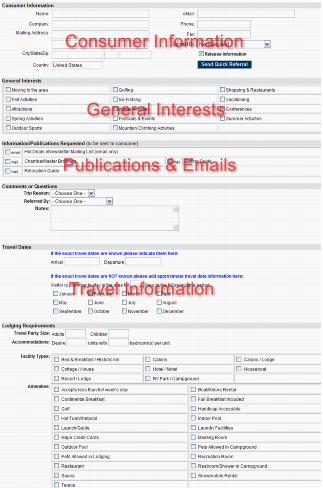
Consumer information is saved on this screen and automatically listed on the Lead Management screen where chamber employees may view and print lead information using several filters - - consumer name, interest category, date, or date range. Other options on the Lead Management screen include the ability to distribute these leads to targeted groups of members. These groups are separated into general interest lead groups and travel lead groups, which are created in the Groups module and designated as General Lead List Contact Groups or Travel Lead List Contact Groups in the Setup module. The General Interest check box(es) selected by the consumer or chamber employee determines which group will be marked to receive the general interest lead. Travel leads are queued for distribution when travel information is specified.
General Consumer Interests are general categories in which you expect inquiry from your consumer base. When users indicate they would like more information about a particular Interest the system will contact you and any members you have associated with that Interest with the user's contact information and questions/comments. Further, if you indicate that an Interest should prompt the user for Travel dates and accommodation requirements information that information will also be returned to the associated members. Some typical Interests include Vacationing, Relocation/Jobs, and Area Attractions.
Add/View/Edit Consumer Interests
- Click Setup.
- Click Consumer "Interest" Options in the Info Request section. A list of consumer interests will be displayed. You may edit an existing consumer interest by clicking its hyperlink.
- Click the Add Interest link to add a new consumer interest.
-
- Configure the following:
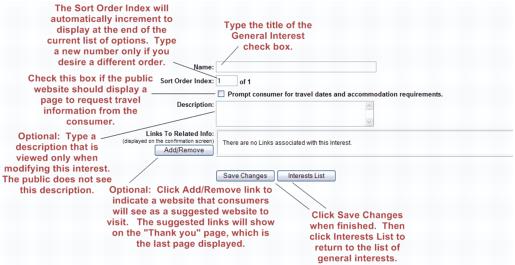
- Name: This is the name of the consumer interest that will be displayed on the info request form.
- Sort Order Index: This setting allows you to organize the interests on the info request form. It will automatically increment to the last position, but you may organize the order in which the interests are displayed.
- Description: This description is for internal use only.
- Links To Related Info: You may include links that will be displayed on the thank you page once an info request has been submitted. Click the Add/Remove button to add or remove links.
- Associated Groups: You can choose a group to associate this info request to.
- Associated Publications: Choose the publications that will automatically be selected when this interest group is chosen.
- Click Save.

NOTE: Trip Purpose options are displayed only on the Info Request screen for chamber employees. These options are not available on the public website.
Add a new Trip Purpose
- Click Setup in the left-hand navigation bar.
- Click Consumer “Trip Purpose Optionsin the Information Request area.
-
- Type the name of the new Trip Purpose in the New Purpose Name field.
- Click Add Purpose.

Referred by options are displayed on the Info Request screen for staff to use and are also available for selection by consumers on the public website.
Add a Referred by Option
- Click Setup in the left-hand navigation bar.
- Click Consumer "Referred by" Options in the Information Request area.
- Click Add New Referral Type.
- Complete the Add New Consumer Referral Source area.
-
- Click Save Changes.
- Click Referral Types List to return to the list of Referred by options.

General Interest check boxes (options), Consumer Trip Purpose Options, and Consumer Referred By Options may be designated and modified by the Chamber Administrator.
The Chamber Administrator is the person at the chamber with Administrator level permissions in ChamberMaster. These basic setup selections are all that is necessary to allow the capture of consumer information and to view and print leads. To set up, manage, and distribute publications, general interest leads, and travel leads refer to instructions given later in this document.
General Interests may be added, modified, disabled, and removed from the online and internal Info Request form.
Add a General Interest Option
- Click Setup in the left-hand navigation bar
- Click Consumer “Interest” Options in the Information Request area.
- Click Add New Interest.
- Complete the Add New Consumer Interest area.
- Associated Publications and Associated Groups may be modified later. See Info Request Publications and Emails and Manage Info Request Leads.
- Click Save Changes and then click Interests List to return to the list of general interest options.
Edit Existing General Interest Options
- Click Setup in the left-hand navigation bar
- Click Consumer “Interest” Options in the Information Request area.
- Click the name of the desired general interest option in the Name/Title column that you wish to edit.
- Make the desired changes.
- Click Save Changes and then click Interests List to return to the list of general interest options.
Caution: Consumer requests that contain a General Interest that is now removed, will no longer display that interest in the Lead Management screens.
Delete a General Interest Option
To delete a General Interest option, it must first be disabled. A disabled option does not display on the public website but is still an option for the chamber employees as they fill out the Info Request screen.
- Click Setup in the left-hand navigation bar
- Click Consumer “Interest” Options in the Information Request area.
- If not already disabled, click Disable in the Action column of the desired General Interest option to be deleted. A new Status of Disabled will be displayed.
- Click Remove in the Action column of the desired General Interest option to be deleted.
- Click OK.
Disable a General Interest Option
A disabled option does not display on the public website but is still an option for the chamber employees as they fill out the Info Request screen.
- Click Setup in the left-hand navigation bar
- Click Consumer “Interest” Options in the Information Request area.
- Click Disable in the Action column of the desired General Interest option to be deleted. A new Status of Disabled will be displayed.
Enable a General Interest Option
- Click Setup in the left-hand navigation bar
- Click Consumer “Interest” Options in the Information Request area.
- Click Enable in the Action column of the desired General Interest option to be deleted. A new Status of Active will be displayed.
Trip Purpose options are displayed only on the Info Request screen for chamber employees. These options are not available on the public website.
Add a new Trip Purpose
- Click Setup in the left-hand navigation bar
- Click Consumer “Trip Purpose” Options in the Information Request area.

- Type the name of the new Trip Purpose in the New Purpose Name field.
- Click Add Purpose.
Edit a Trip Purpose
- Click Setup in the left-hand navigation bar
- Click Consumer “Trip Purpose” Options in the Information Request area.

- Click the Edit Purpose arrow to select the desired Trip Purpose.
- Edit the Trip Purpose name and click Update Purpose
Remove a Trip Purpose
- Click Setup in the left-hand navigation bar
- Click Consumer “Trip Purpose” Options in the Information Request area.

- Click the Edit Purpose arrow to select the desired Trip Purpose to be deleted.
- Click Remove.
- Click OK.
Referred by options are displayed on the Info Request screen for chamber employees to use and are also available for selection by consumers on the public website.
Add a Referred By Option
- Click Setup in the left-hand navigation bar
- Click Consumer “Referred by” Options in the Information Request area.
- Click Add New Referral Type.
- Complete the Add New Consumer Referral Source area.

- Click Save Changes and then click Referral Types List to return to the list of Referred by options.
Edit Existing Referred By Options
-
Click Setup in the left-hand navigation bar
- Click Consumer “Referred by” Options in the Information Request area.
- Click the name of the desired Referred by option in the Name/Title column that you wish to edit.
- Make the desired changes.
- Click Save Changes and then click Referral Types List to return to the list of Referred by options.
Caution: Consumer requests that contain a Referred by the option that is now removed, will no longer display that option in the Lead Management reports.
Delete a Referred By Option
To delete a Referred by option, it must first be disabled. A disabled option does not display on the public website but is still an option for the chamber employees as they fill out the Info Request screen.
- Click Setup in the left-hand navigation bar
- Click Consumer “Referred by” Options in the Information Request area.
- If not already disabled, click Disable in the Action column of the desired Referred by option to be deleted. A new Status of Disabled will be displayed.
- Click Remove in the Action column of the desired Referred by option to be deleted.
- Click OK.
Disable a Referred By Option
A disabled option does not display on the public website but is still an option for the chamber employees as they fill out the Info Request screen.
- Click Setup in the left-hand navigation bar
- Click Consumer “Referred by” Options in the Information Request area.
- Click Disable in the Action column of the desired General Interest option to be deleted. A new Status of Disabled will be displayed.
Enable a Referred By Option
- Click Setup in the left-hand navigation bar
- Click Consumer “Referred by” Options in the Information Request area.
- Click Enable in the Action column of the desired General Interest option to be deleted. A new Status of Active will be displayed.

