Many settings in this area have been preset based on your individual configuration with ChamberMaster. You may not have to change any selections shown here. Contact Support if you are unsure of the effect of changes. If making any changes, please record the current settings before making any modifications.
- Click Setup in the left-hand navigation bar.
-
- Click General Options & Settings in the Association Information area.
-


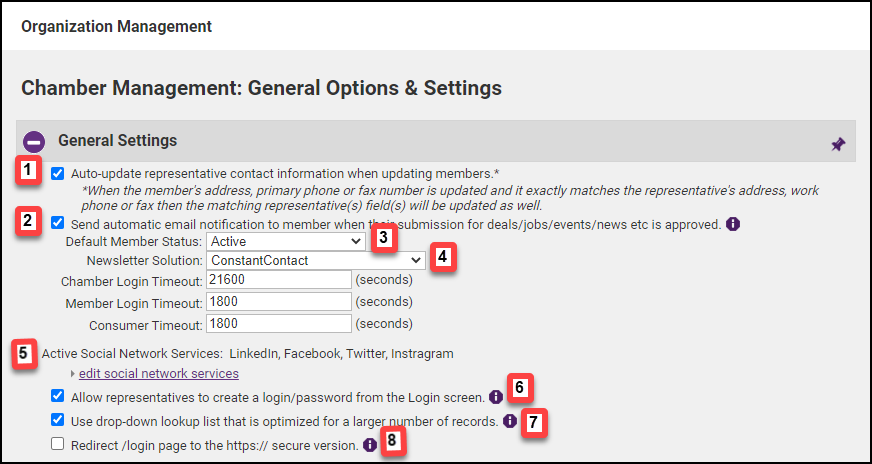
- Auto-update representative contact information when updating members: This will default to on for new associations. Existing associations will have to check to select this option so that individual representative information will automatically update when the matching member information General tab is updated. When the member's address, primary phone, or fax number is updated and it exactly matches the representative's address, work phone, or fax then the matching representative(s) field(s) will be updated as well.
- Send automatic email notification to members when their submission for deals/jobs/events/news etc is approved: Defaulted to on. Members will receive an automatic email when staff sets their submission to Approved. No notice is sent if a submission is disabled or deleted. The email is sent to the following email address based on these criteria:
-
- Member created the content, no primary rep designated: Member is the recipient.
- Member created the content, 1 or more primary rep designated: Primary rep(s) is the recipient.
- Rep created the content: rep is the recipient
Note: if a valid email address is not associated with the rep or member, then no email will be sent.
- Default Member Status: When new members are created by clicking the Add button on the toolbar, the Status drop-down will have the default status selected here. Choices are Active, Courtesy, Non-Member, Prospective, or Dropped.
- Newsletter Solution: Select Constant Contact to display Constant Contact menu choices within ChamberMaster/MemberZone. You may also select MailChimp or both MailChimp and Constant Contact. Note: Also complete the Constant Contact section in the Add-On Manager area below.
- Active Social Network Services: This will display the Social Networks that you have enabled. Click the edit social network services link to add or delete social networks.
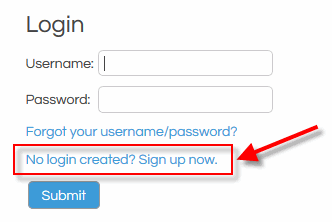
- Allow representatives to create a login/password from the Login screen: When this option is selected, a No Log-in created? Sign Up Now link will be displayed on the MIC login page. After clicking Sign up now, the rep enters their email address. If their email address exists in your database, on only rep, a verification email is sent to that address where the Create Account link is provided. Last Name is requested if the rep email exists more than once on a single member. If their email address does not exist in your database, they are advised to contact your organization for additional information.
- Use a drop-down lookup list that is optimized for a larger number of records: Select this option if you wish to use the type-ahead search result that not only displays results that match the "start of the record" but also displays those that match 'any part of the record name".
- Redirect /login page to the HTTPS:// secure version: SSL login page is available for your members, to be enabled at your discretion. As a trusted voice to your membership, we are allowing you to enable this secure login page when you desire since we realize that a redirect from a familiar login page to a different-looking login page could cause concern without proper warning
- Enable Sponsorship Ads
- Use Complete-Package banners as filler in contexts with no other banners
- Premium Banner Position
- Premium Banner Size
- Non-ChamberMaster Banners
- Max Banners in Rotation
See Using the Marketing Package for more information.
- Info Request Release Disclaimer: This is the message that is displayed on your Info Request page.
- Info Request - Thank you Message: This is the text that will appear in the browser after someone has submitted an info request.
See Information Request Setup for more information.

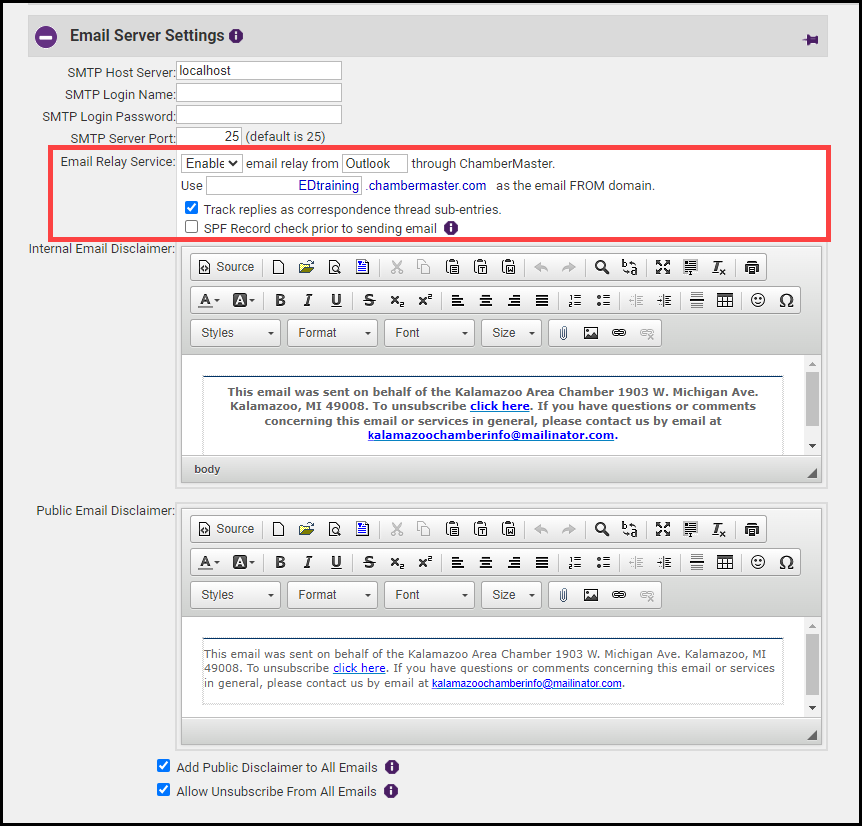
Email Relay Service
In Outlook (or whatever email program you use), include your association’s unique archive address as a BCC. The software will look at the address sent/replied to and place it on the communication history of the associated member. Emails with addresses that are not recognized will still be archived but placed under Communication > Manage Unmatched Archive Emails where you can go to view and manually match them to the appropriate member. View a video showing how to archive an email.
|
|
NOTE:
|
SPF Record check prior to sending an email
Select this setting if you have properly configured your SPF record with the appropriate entry. If this setting is enabled, emails that are sent through your database will only be sent to the recipients after being checked against your SPF record. Having this extra check against the SPF record will eliminate scenarios where someone maliciously sends an email making it look like the email came from you but really was sent from another IP address. This extra check will verify that the sender of the email is truly from your domain.

Add-on Manager
- API Access: An Application Programming Interface (API) is available to 3rd party developers who wish to create their own applications from your database. If you have someone wanting to develop a special-use application for you, contact Support to receive a unique API key for your developer and the API documentation. Access is only granted to a 3rd party developer with your express permission.
- ConstantContact Integration Setup: If you have a subscription to Constant Contact, record your subscription login and password here. Having the login credentials recorded here will allow the automatic opening of your Constant Contact account from certain menu selections in ChamberMaster/MemberZone.
- Example: Communication > Newsletters/Email Campaigns. To also allow ChamberMaster/MemberZone to automatically update your Constant Contact lists, select one or both of the synch checkboxes. See Enable Constant Contact Synchronization for more information.
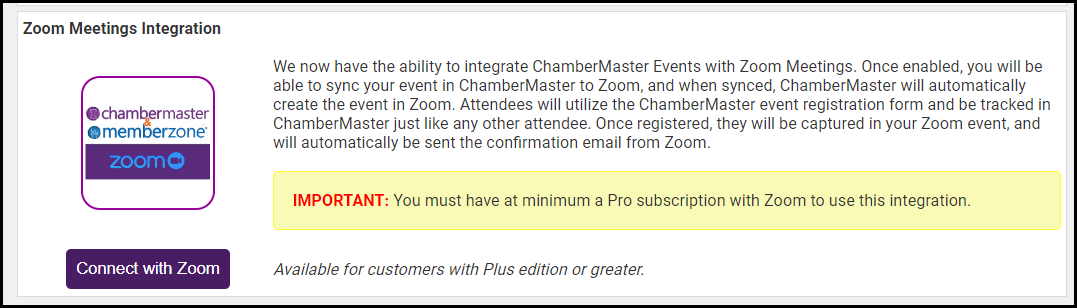
- Zoom: We now have the ability to integrate ChamberMaster/MemberZone Events with Zoom Meetings. Once enabled, you'll be able to sync your event in ChamberMaster to Zoom, and when synced, your software will automatically create the event in Zoom. Attendees will utilize the event registration form and be tracked in your database just like any other attendee. Once registered, they'll be captured in your Zoom event, and will automatically be sent the confirmation email from Zoom.